Port Wine Poached Pears are a stunning and delicious fall and winter dessert. Full of warming spices, they're fantastic on their own, over ice cream, in a tart, and even alongside chicken. This poached pear recipe is easy to make and so impressive!
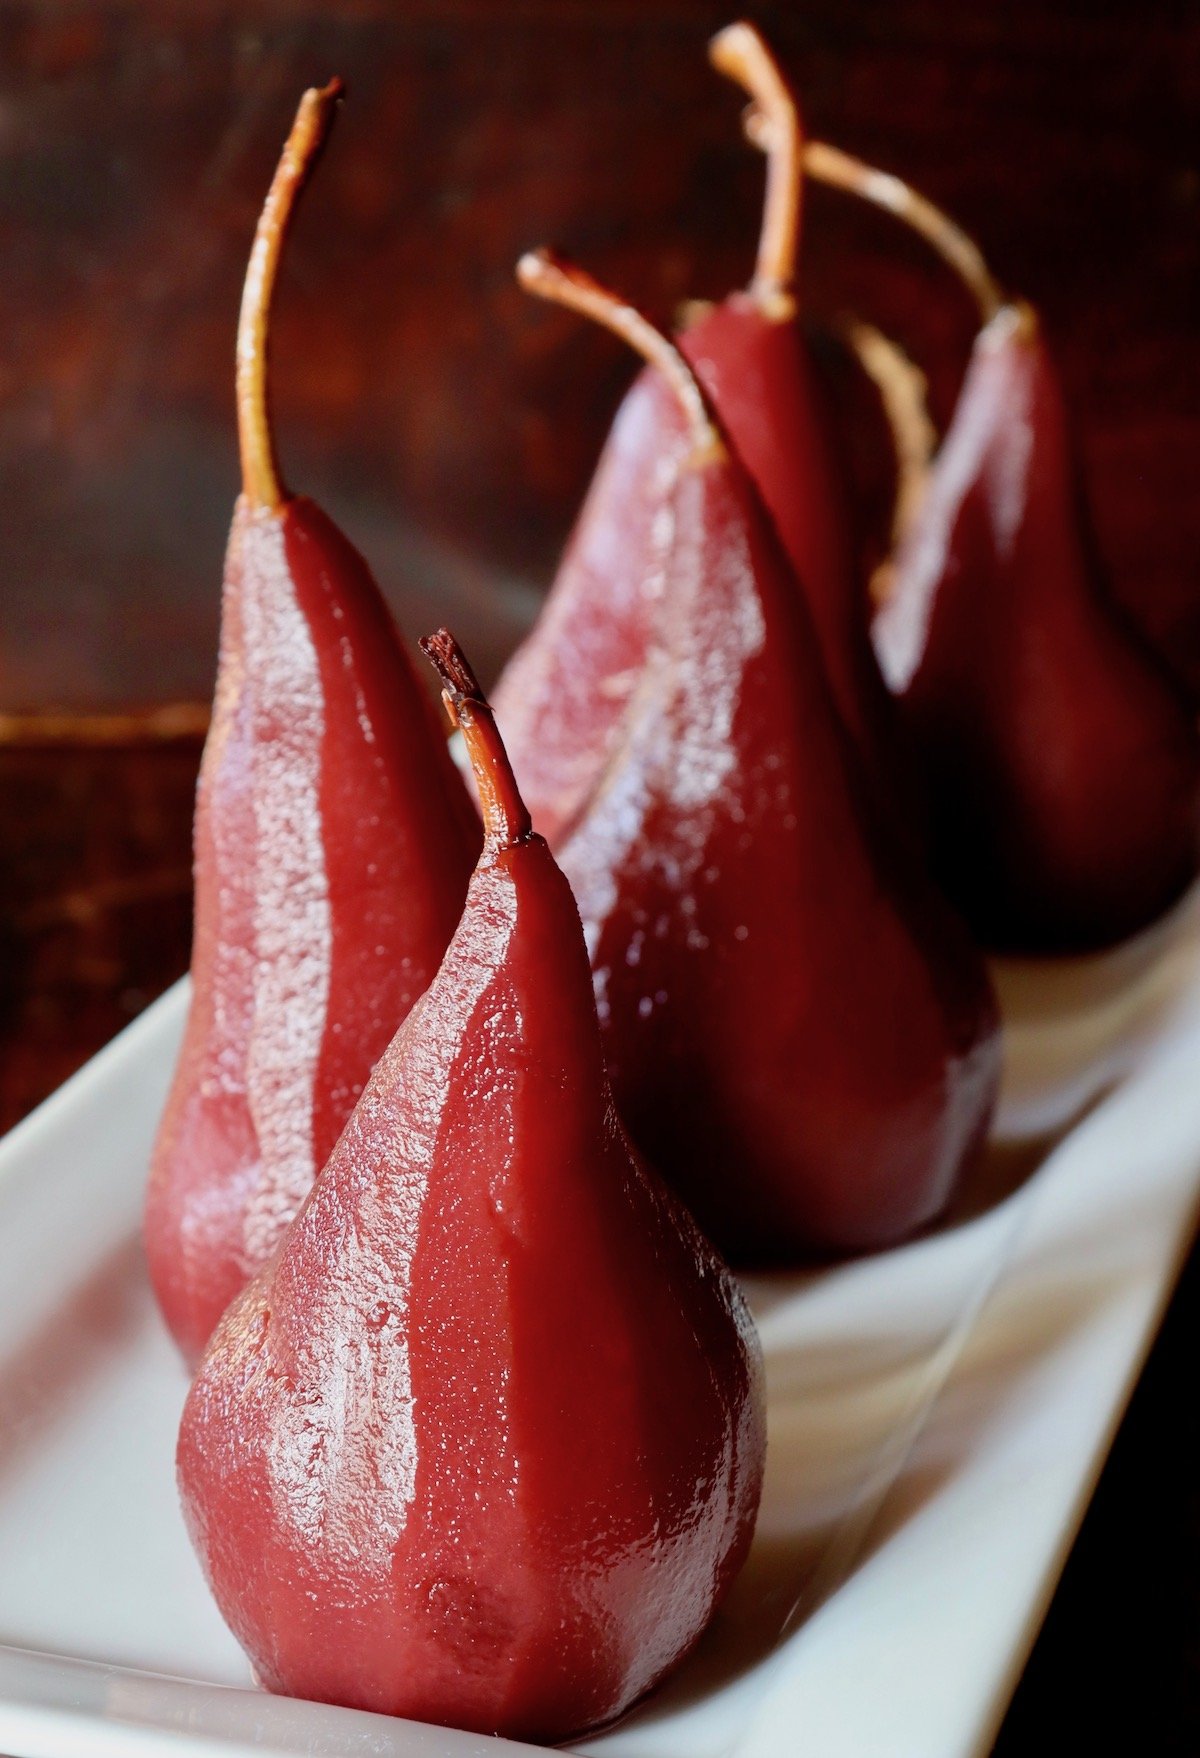
Poaching pears in port wine takes the fall fruit to another level.
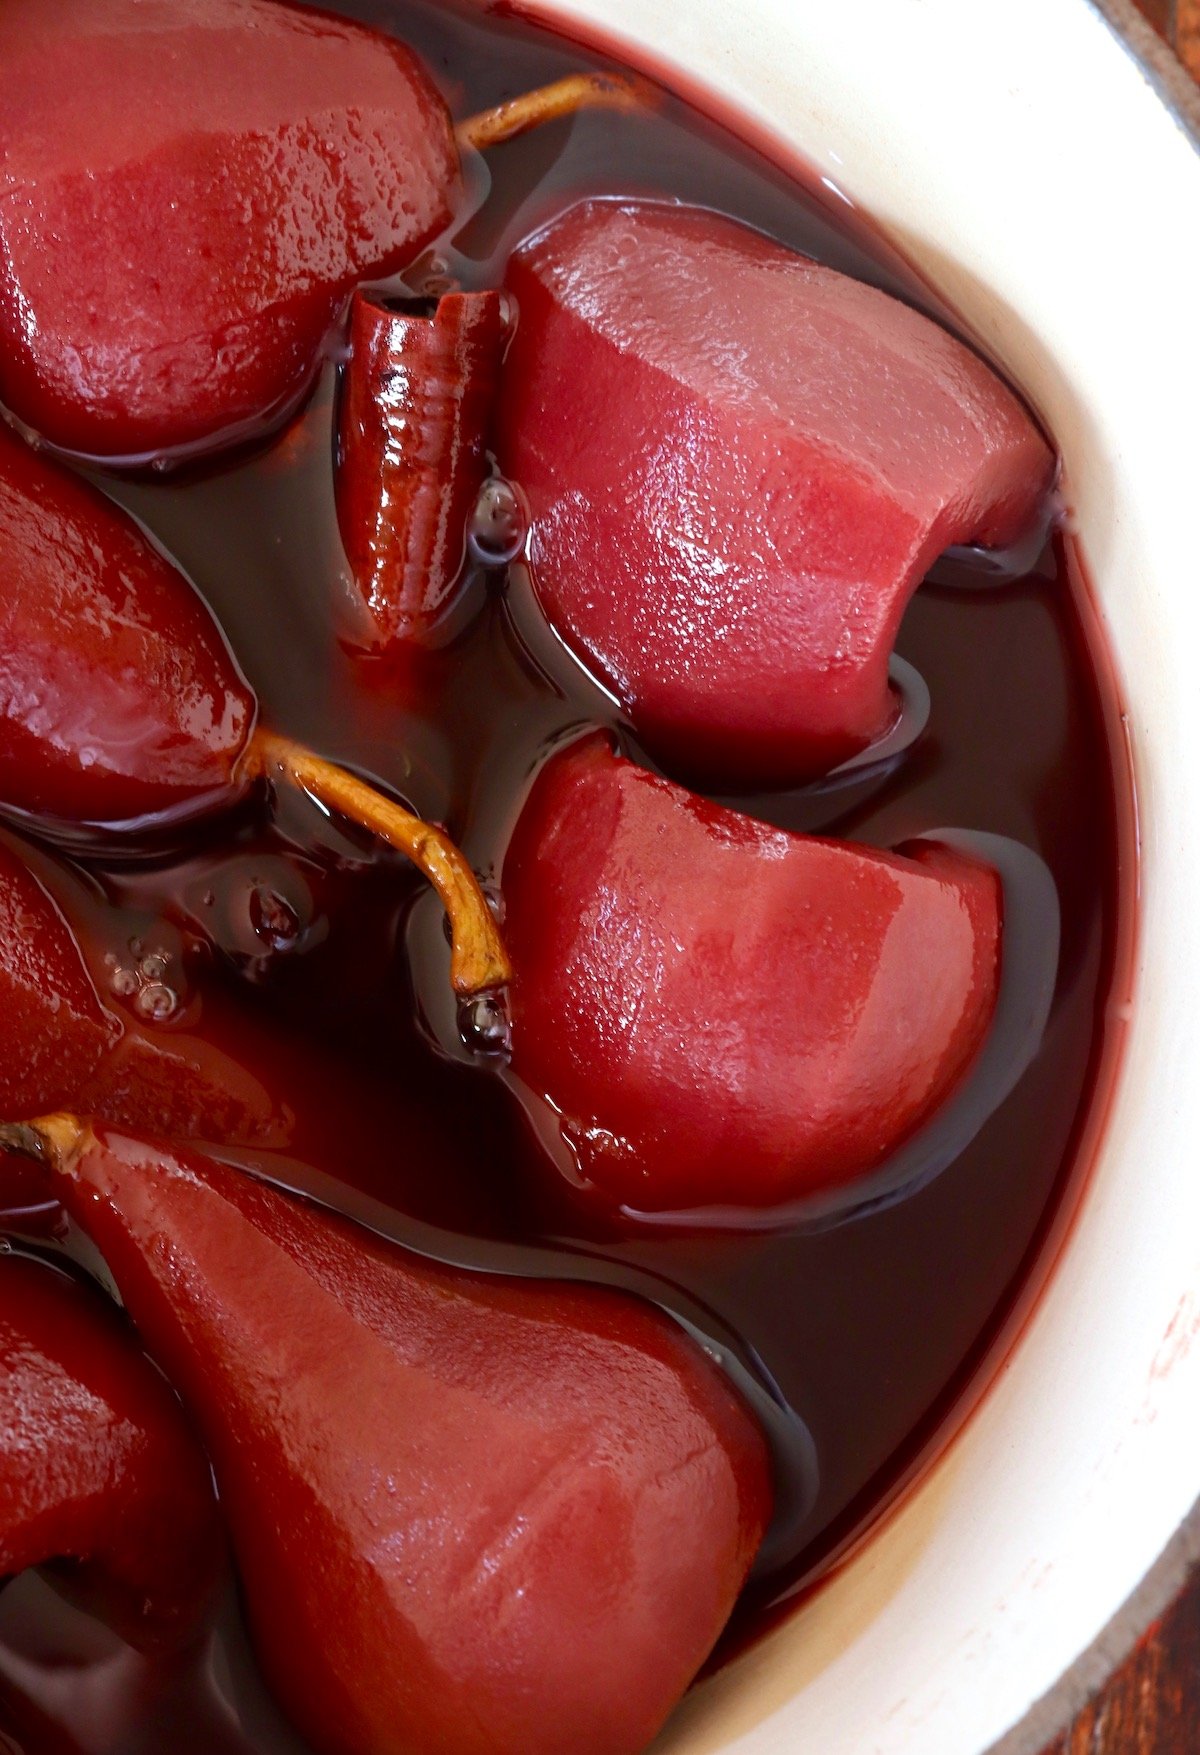
The pears steep in Ruby port wine for hours, along with cinnamon sticks, star anise and fresh thyme. It's a beautiful, aromatic and rich combination of flavors.
There are a variety of ways to present port poached pears, and they range from pretty to prettier!
Poaching pears is essentially cooking them submerged in a liquid on the stove. They're most commonly poached in simple syrup, but are often poached in red or white wine.
The flavors can vary widely, and you can tailor the liquid to your taste by adding spices, fruits and using different sweeteners.
In addition to the wine, this recipe for poached pears is full of earthy and delicious warming spices.
Key Ingredients
pears + port wine
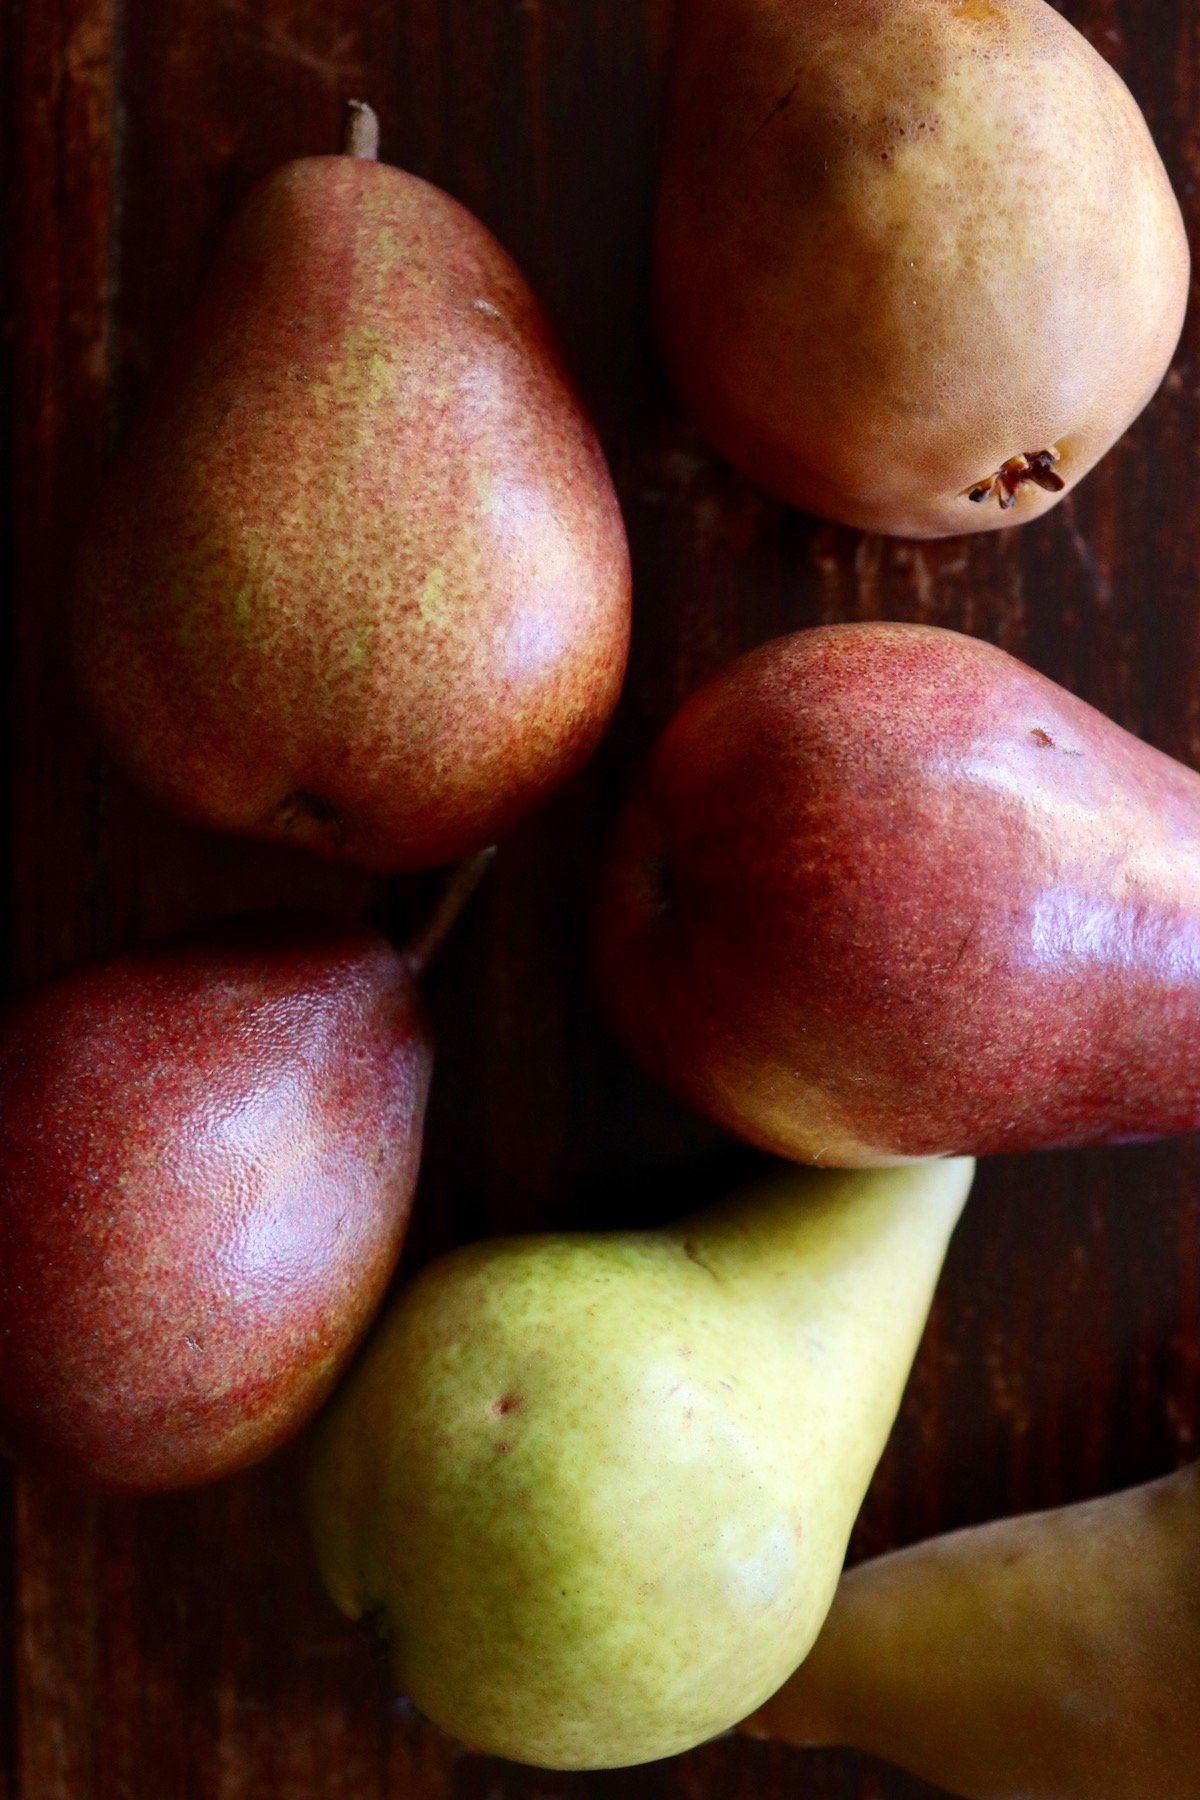
What are the best pears for poaching?
Firm pears are best for poaching because they hold their shape well. Anjou, Bartlett, Comice, Asian, and Bosc pears are all great choices.
Recipe Tip: Be sure not to use pears that are overly ripe or too soft because they likely won't hold their shape when you poach them.
What is Port Wine?
Port is a fortified dessert wine from Douro Valley of northern Portugal.
There are several varieties of port, but there are two main types: red Ruby port, which has a berry-like flavor, and Tawny port, which has more of a caramel, nut-like flavor. Both are sweet, but the Tawny is a bit sweeter, and is more of a brown color than red.
- In this recipe for poached pears I use Ruby port, though you can use Tawny port instead if you'd like.
If you're interested, you can learn more about port wine in this article.
How to Make Them
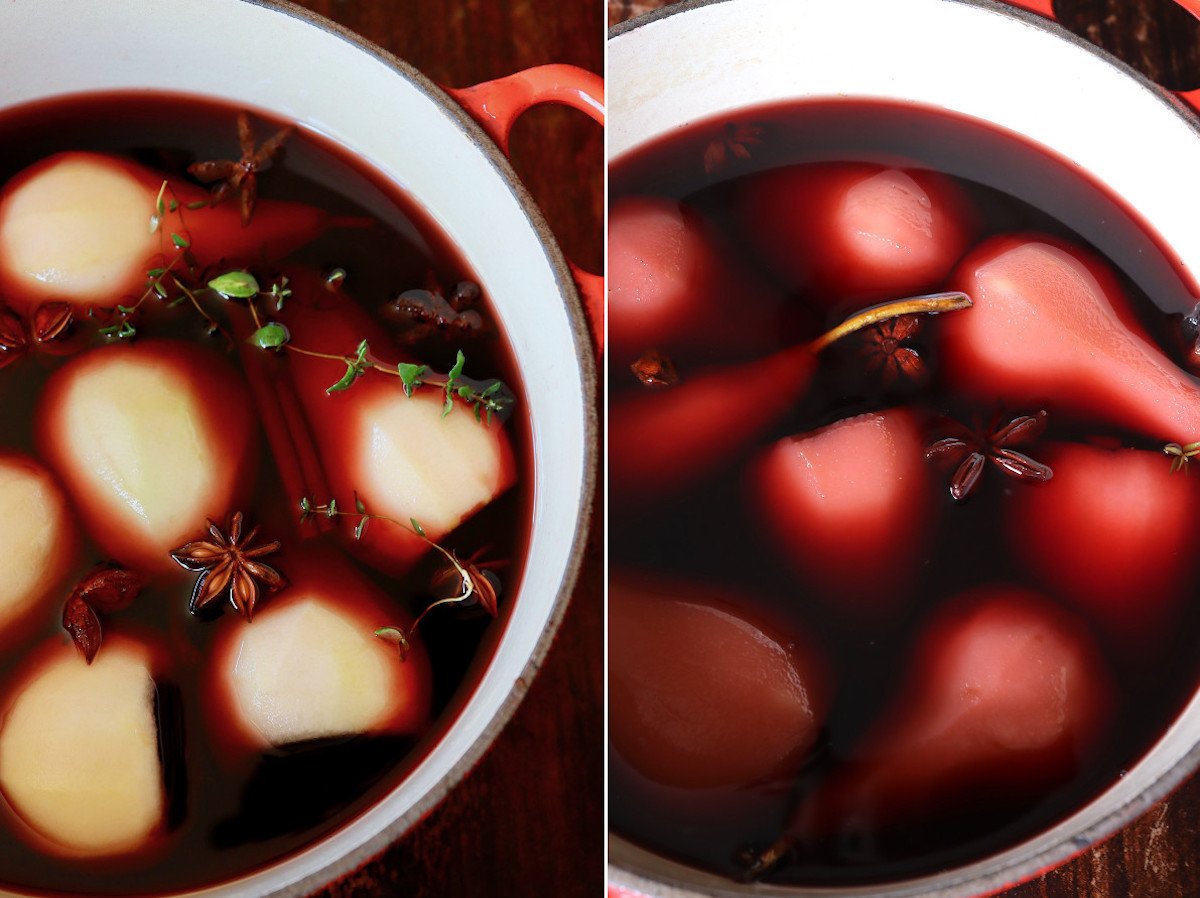
- Add the port wine, sugar, star anise, cinnamon and thyme to a large pot. Warm it over medium heat just long enough to dissolve the sugar.
Recipe Tip: Since the port is already sweet, there isn't much sugar in this recipe. Feel free to add more or less to suit your taste.
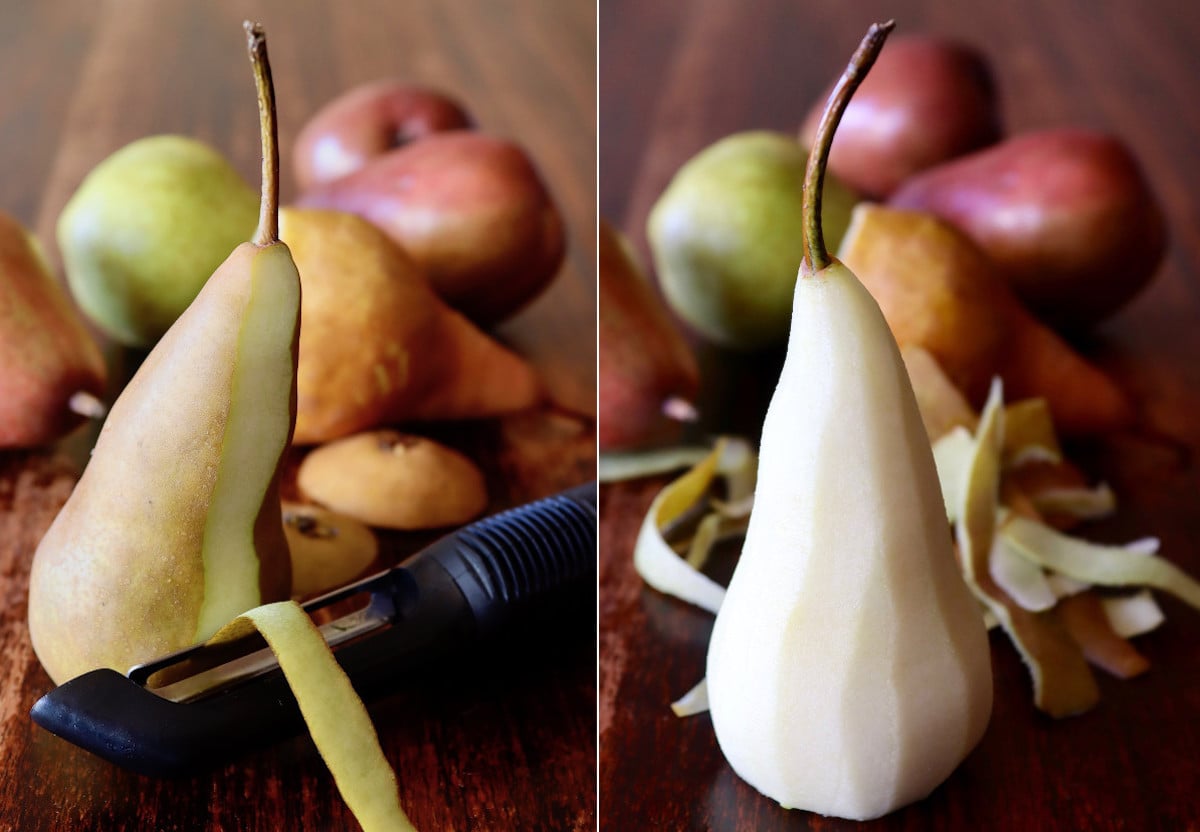
- First cut a small base on the bottom of each pear. Then use a tiny melon baller to gently scoop out a small hole from the bottom of each one, working your way all the way into the pear to remove the seeds.
Recipe Tip: It's important that your poaching liquid is ready before you start to peel the pears, or they'll discolor. If there is a time lapse, drizzle them with lemon juice in the interim. (Even with the red color, the discoloration can still be evident.)

Recipe Tip: If you don't have a melon baller, use a strong, tiny spoon or a paring knife. If you use the knife, move it in a circular motion, up the center of the pear.
- Peel the pears, from the top down, beginning right at the stem. Add each pear to the port wine poaching liquid as you work.
- Over medium-high heat, bring the liquid to a strong simmer and then reduce the heat to the lowest setting, to a gentle simmer, just until the pears are tender. Use a fork to gently pierce a pear to see how soft it is. They should be tender, but still firm enough to hold their shape nicely.
- Turn off the heat and let the pears sit in the poaching liquid for at least 3 hours and up to a week. Store them in the liquid, refrigerated in a tightly sealed container. Do not refrigerate until they've cooled to room temperature. The longer the pears sit in the poaching liquid, the deeper the red color will be and the stronger the flavor.
- When you're ready to serve -- or whenever you ultimately remove the pears from the liquid, use a large slotted spoon to do so. Set the pears aside, and pour the liquid through a fine mesh strainer into a small pot. Over high heat, bring it to a boil, then reduce the heat to a simmer until it has reduced by at least half. This should take about 15 minutes, and the result will be a sweet, thick port wine syrup.
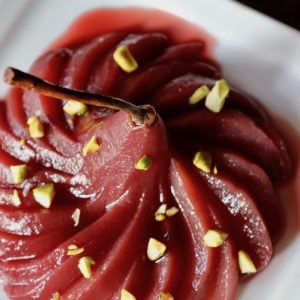
- Slice the pears any way you'd like, or serve them whole (ideas are below). Drizzle with the glaze and garnish with finely chopped nuts if desired.
Serving Ideas
- Port Wine Poached Pears are outstanding on their own.
- Reduce the poaching liquid and you'll have an amazing port wine glaze to drizzle over them. (Which is what we do in this recipe.)
- Fill the cavity (from where the seeds and core have been removed) with whipped cream, mascarpone or vanilla bean custard.
- Slice them and serve them over a scoop of vanilla ice cream. (I like using mild-flavored ice creams with them so it doesn't compete with their delicious flavor.)
- The pears are perfect for filling tarts and pies.
- These two ideas might throw you, but trust me . . . . serve them sliced with roasted chicken or duck. (Imagine cranberry sauce and turkey.) Or slice them and add them to salads. (This is especially delicious with spiced pecans.)
Variations
- Spices. Feel free to change up the spices and/or add other flavors. Cloves, cardamom, black peppercorns, and ginger would also be great.
- Citrus. You can add orange juice, a couple large pieces of orange peel or tablespoons of zest to the poaching liquid.
- Other poaching liquids. You can use this pear poaching method with other wines also, and with most simple syrups. This Hazelnut Simple Syrup is my favorite and it's excellent with pears.
- Apples. You can use this poaching method for apples too.
Pictured below are a few different presentations . . . .
It's pretty to sprinkle them with finely chopped nuts to contrast their color. I especially love how pistachios look.
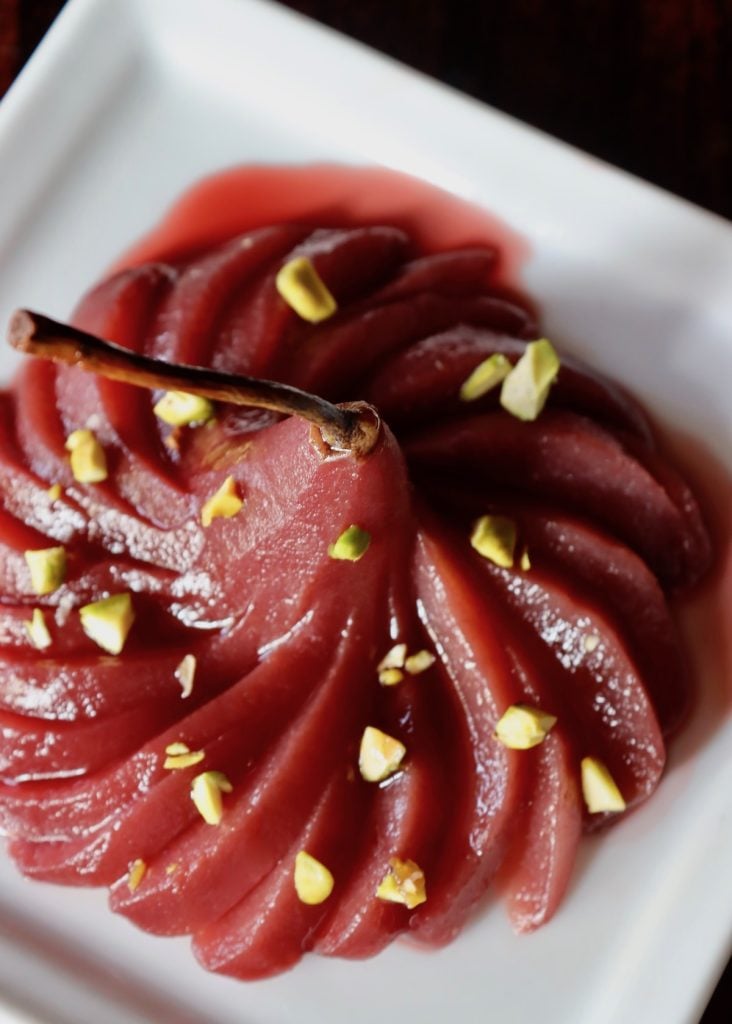

Above left: Whole poached pear sitting on glaze, sprinkled with cacao nibs. Above middle: the pear is sliced thinly, fanned, and sprinkled with finely chopped pistachios. Above right: Pear halves are sliced thinly and drizzled with the glaze.
Can you make them ahead?
- Poached pears are actually even better when they're made ahead. As I mentioned above, the longer the pears sit in the poaching liquid, the deeper the red color will be and the stronger the flavor. In my experience they never get too strong. I think they go from delicious to even more delicious the longer they marinate.
- You can make them up to a week ahead, and they should be stored in the refrigerator in the liquid they were poached in, in a tightly sealed container.
- A reason to serve them soon after they've poached, or to poach them for less time, is the color. When you slice into a Ruby port or red wine poached pear that has only marinated for about an hour, the pear will still be its natural cream color in the center. Here's an example. And when they marinate overnight, the red color goes all the way through. Either way, they're beautiful.
More Must-Try Pear Dessert Recipes
- Asian Baked Pears with Honey
- Rosemary Roasted Hasselback Asian Pears
- Coco & Lavender's Pear Frangipane Tart
I hope you love this recipe as much as I do!
Port Wine Poached Pears
Ingredients
- 3 cups Ruby port wine (about 1 bottle)
- ¼ cup granulated sugar
- 8 small-medium pears (about 4 ounces each, ripe, but firm), I suggest Bosc or Comice
- about 5 whole star anise
- about 3 (approximately 3 inch) cinnamon sticks
- a few sprigs fresh thyme, washed and dried
Instructions
- Make the poaching liquid. Add the port wine, sugar, star anise, cinnamon and thyme to a large pot. Warm it over medium heat just long enough to dissolve the sugar.
- Prepare the pears. Start this step only when the poaching liquid is ready. First cut a small base on the bottom of each pear. Then use a tiny melon baller to gently scoop out a small hole from the bottom of each one, working your way all the way into the pear to remove the seeds. Add each to the wine marinade as you work. If you don't have a melon baller, use a strong, tiny spoon or a paring knife. If you use the knife, move it in a circular motion, up the center of the pear. Peel the pears, from the top down, beginning right at the stem. (Add each pear to the port wine poaching liquid as you work.
- Poach/Marinate. Over medium-high heat, bring the liquid to a strong simmer and then reduce the heat to the lowest setting and gently simmer just until the pears are tender. Use a fork to gently prod a pear to see how soft it is. They should be tender, but still firm enough to hold their shape nicely. Turn off the heat and let the pears sit in the poaching liquid for at least 3 hours, and up to a week. (Store them in the liquid, refrigerated in a tightly sealed container. Do not refrigerate until they've cooled to room temperature.)
- Make a port wine glaze. When you're ready to serve -- or whenever you ultimately remove the pears from the liquid, use a large slotted spoon to do so. Set the poached pears aside, and pour the liquid through a fine mesh strainer into a small pot. Over high heat, bring it to a boil, then reduce the heat to a simmer until it has reduced by at least half. This should take about 15 minutes, and the result will be a sweet, thick port wine syrup.
- Serve. Slice the pears any way you'd like to, or serve them whole. Drizzle with the glaze and garnish with finely chopped nuts if desired.
NOTES
NUTRITION
Cooking On The Weekends is a participant in the Amazon Services LLC Associates Program, an affiliate advertising program designed to provide a means for sites to earn advertising fees by advertising and linking to Amazon.com.

angiesrecipes
Such a gorgeous holiday dessert! I really love the flavour and the cute purple colour.
valentina
Thanks, Angie! 🙂 ~Valentina
David Scott Allen
Poached pears are one of our favorite desserts — flavorful, fulfilling, and yet quite light. I’ve not poached them in port, though — this would make them even better! Thanks for the shout out for the Pear Frangipane Tart! 💖
valentina
David, I love your Pear Frangipane! 🙂 Hope you try the pears in port and love them. Thank you and happy weekend. ~Valentina
Ben | Havocinthekitchen
Wine poached pears always look stunning and taste delicious - perfect for the holiday season. And I often poach pears in wine for my salads and meat so the idea doesn't sound bizarre at all 🙂
valentina
Thanks so much, Ben. Happy you can relate to the pears + meat. 🙂 Love them in salads, too. 🙂 ~Valentina
Eha Carr
I rarely make or eat dessert - but if I do, fruit is usually involved. Poach pears in wine in a similar manner to you quite often . . . have not tried port and should ! Am a 'tawny port' person . . . rather popular in the Anglo-Saxon world ! I have actually served the pears as accompaniment to duck slices as a primo: a good match . . . thanks !!!
valentina
Hi Eha. Thank you. 🙂 I hope you try pears with port and love it. I do love the Tawny too. And as for not eating too many desserts . . . I wish I didn't crave them as much as I do.:-) ~Valentina
Chef Mimi
Just gorgeous indeed! I love port, and I also love it in recipes. And what a pretty color!
valentina
Thanks so much, Mimi! 🙂 ~Valentina
Marissa
Stunning really is the perfect description of these pears, Valentina. Just, WOW! I also love that they’re not just gorgeous, but a dessert that’s much lighter than your typical holiday treat.
valentina
Thank you, Marissa! I'm with you on it being nice to have a holiday dessert choice that's on the lighter side. (Though I still need my chocolate!) 🙂 ~Valentina
Karen (Back Road Journal)
Love the color of your poached pears. I've used red wine to poach them before but really like the idea of using ruby port. I'll be serving poached pears on Christmas Eve and I'll definitely be trying your recipe. Thanks for the inspiration.
valentina
Thanks, Karen. Hope you love them and happy holiday season! 🙂 ~Valentina
Frank
Beautiful! I love poached pears although I've always used red wine (sweetened with sugar) rather than port. And lazy as I am, I've never cored the pears... I'll have to give this version a go. They look amazing!
valentina
Hi Frank! Thanks for visiting and I hope you love the pears. I love them in all sorts of red wines. Enjoy and happy holiday season to you and yours. 🙂 ~Valentina
2pots2cook
Amazing winter dessert ! Got to get pears and wine to prepare for holidays !
valentina
Hi Davorka! Thanks and a very happy and warm holiday season to you! 🙂 ~Valentina