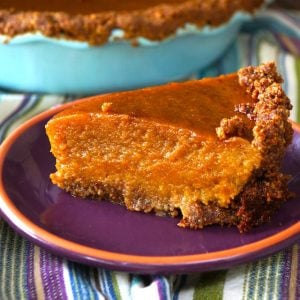
Butternut Squash Pie with Nut Crust is gluten-free and full of delicious chai spices. This pie tastes like the perfect blend of pecan pie and pumpkin pie -- only it's neither one and even better!

Though this butternut squash pie is reminiscent, and just as incredible as my Caramel Pumpkin Pecan Pie, it's subtly different and will also wow your Thanksgiving guests.
You can easily make the entire pie from scratch, starting with a whole butternut squash.
Butternut Squash Pie with Nut Crust is rustic looking, in the coolest, most beautiful way.
Most of the prep time for this recipe is refrigeration and baking time.
Ingredient Notes

- whole butternut squash - Check out this guide to roasting butternut squash. It's easy. Substitution: Though it's awesome to roast and purée you own butternut squash (instructions linked below), to save time, you can buy butternut squash purée. (I don't judge!) And you can make it a pumpkin pie and use pumpkin purée.
- cinnamon, cardamom, nutmeg, ginger, and cloves - Together these warming spices make a chai flavor, which is absolutely dreamy in a sweet butternut squash pie.
- pecans and walnuts - Be sure to purchase unsalted nuts. You can use more or less or each or one or the other. Substitution: Though I think this crust is really quite special, if you really want to save time, you can of course use a prepared pie crust of your choice!
How to Make it
- The butternut squash should be roasted well ahead of time. I usually do it the day before I'm making the pie. Here's my super easy method for roasting a whole butternut squash.


- Add the pecans and walnuts to a food processor fitted with the blade attachment and blend until it's just becoming -- but isn't quite -- a paste. They should be somewhere between a powder and paste.
- Add the processed nuts to a medium-sized mixing bowl and add the melted butter, sugar, cinnamon, ginger, nutmeg and salt. Mix until everything is evenly blended and then press it into a 10-inch pie plate.
- The crust will be about ½ inch thick, thicker than a typical pie crust. If it's easy, bring the crust on top of the top edge as it will shrink a bit during the baking time. If that seems tricky, just go up as high as you can.


- Place the prepared crust in the refrigerator for at least 45 minutes, and during that time, preheat the oven to 350°F.
- Once the oven is preheated and the pie has refrigerated for at least 45 minutes, place the pie plate on a baking sheet and bake until it's becoming golden and is sizzling, about 20 minutes. Set it aside to cool, and keep the oven on.
- In a medium-sized mixing bowl, use a whisk to blend the 4 cups of butternut squash purée (see notes) with the sugar, eggs, egg yolk, cinnamon, cardamom, ginger, cloves and pinch of salt. Mix the cornstarch with 1 tablespoon of then add it to the filling and mix.
- Once the crust is about room temperature, pour in the filling. Keeping the filled pie on the baking sheet, place it in the (still) preheated 350°F oven and very loosely, cover it with a piece of foil.
- Bake it this way for 1 hour, then remove the foil and bake until it's set, about 10 more minutes. When you move the baking sheet, it should no longer jiggle in the center. (Cooking times may vary.)

Recipe Tips
- This pie is more orange in color the day it's baked. The next day it's equally as delicious, but less orange, and more brown. Again, it's rustic. 😉
- Yes, the top edges of the crust might fall apart a bit while serving - that's okay! This gluten-free nut crust recipe is so unique and delicious that you certainly won't mind a few crumbs falling out of place.
- The butternut squash can be roasted two days ahead of time -- and should be roasted at least 6 hours ahead. Here's How to Roast a Butternut Squash. (It is not included in the prep time for this recipe.
- If your squash purée isn't smooth, you can blend it in a food processor with the blade attachment for about 30 seconds.
Can you make the whole pie ahead of time?
Yes, you can make it the day before, keeping it at room temperature with foil loosely covering it.

Enjoy every last bite of this oh-so-delicious Butternut Squash Pie with it's scrumptious gluten-free nut crust!
Butternut Squash Pie Recipe
Equipment
Ingredients
For the crust
- 2 cups raw pecans
- 1 cup raw walnuts
- 5 tablespoons unsalted butter, melted
- ½ cup granulated sugar
- 1½ teaspoons ground cinnamon
- ¾ teaspoon ground ginger
- ½ teaspoon ground nutmeg
- ½ teaspoon salt
For the filling
- 1 (approximately 3 pound) roasted butternut squash (Click here for How to Roast a Butternut Squash), you will need 4 cups (see notes)
- 1 cup granulated sugar
- 2 large eggs
- 1 large egg yolk
- 1 tablespoon pure vanilla extract
- ¾ teaspoon ground cinnamon
- 1 teaspoon ground cardamom
- ¾ teaspoon ground ginger
- ¾ teaspoon ground cloves
- pinch salt
- 1 tablespoon corn starch
Instructions
For the crust
- Grind the nuts. Add the pecans and walnuts to a food processor fitted with the blade attachment and blend until it's just becoming -- but isn't quite -- a paste. They should be somewhere between a powder and paste.
- Add remaining crust ingredients, mix and shape. Add the processed nuts to a medium-sized mixing bowl and add the melted butter, sugar, cinnamon, ginger, nutmeg and salt. Mix until everything is evenly blended and then press it into a 10-inch pie plate. (It will be about ½ inch thick, thicker than a typical pie crust. If it's easy, bring the crust on top of the top edge as it will shrink a bit during the baking time. If that's too tricky, just go up as high as you can.)
- Refrigerate. Place the prepared crust in the refrigerator for at least 45 minutes, and during that time, preheat the oven to 350°F.
- Bake. Once the oven is preheated and the crust has refrigerated for at least 45 minutes, place the pie plate on a baking sheet and bake until it's becoming golden and is sizzling, about 20 minutes. Remove from the oven and let it cool. Keep the oven on.
For the filling
- Combine filling ingredients. In a medium-sized mixing bowl, use a whisk to blend the 4 cups of butternut squash purée (see notes) with the sugar, eggs, egg yolk, cinnamon, cardamom, ginger, cloves and pinch of salt. Mix the cornstarch with 1 tablespoon of water then add it to the filling and mix.
- Assemble and bake. Once the crust is about room temperature, pour in the filling. Keeping the filled pie on the baking sheet, place it in the (still) preheated 350°F oven and very loosely, cover it with a piece of foil. (The foil should not be wrapped around the pie plate, it should be sitting on top, more or less.) Bake it this way for 1 hour, then remove the foil and bake until it's set, about 10 more minutes. When you move the baking sheet, it should no longer jiggle in the center. You can also stick a wooden skewer int he center -- it should come out clean when it's done. (Cooking times may vary.)
- Cool & serve. Cool to room temperature and serve.
NOTES
NUTRITION
Cooking On The Weekends is a participant in the Amazon Services LLC Associates Program, an affiliate advertising program designed to provide a means for sites to earn advertising fees by advertising and linking to Amazon.com.


Deanna
Follow-up Yes, it was a hit, flavor outstanding. The crust did not stay crisp, was it supposed to? Thank you for all the wonderful recipes you offer. Plan on making Chai spiced Carmel Coffee Cake next
valentina
So happy to hear it! Not the crust isn't super crispy, but it should've stayed solid and together. Thanks for the report.Cheers! 🙂 ~Valentina
Deanna
Made the pie as directed for tomorrow's dinner.. Have not cut it yet. Looks like your picture. However, I had to bake MUCH longer and when tested with tooth pick, it never came out clean????? The tooth pick did come out clean on outer part of pie. Will let you know after tomorrow's dinner.
valentina
Hi Deanna. I made this pie tonight also. 🙂 As I say in the recipe, baking times can vary -- I'm sorry it took so long, and that the toothpick test didn't work. I would guess it's cooked through even though it didn't come out clean, since it baked so long. I hope it's delicious, and that it's a hit tomorrow. LMK! Happy Thanksgiving. ~Valentina
Rafael Rosa
Hi Valentina,
Thanks for this recipe. I tried this at home and was amazing. Everyone loved it. The only problem is that I burnt the crust a bit. :-#
But that's alright, I'll (hopefully) improve my technique on the next attempt. 🙂
Cheers!
Raf
valentina
Thanks so much, Rafael. I'm so happy you enjoyed the pie and everyone loved it. Yay! (If you think the crust is getting too dark during the baking time, cover it loosely with foil, by almost just placing it on top, not wrapping it.) Thanks again for sharing, and for reading and trying my recipes. 🙂
Kelly
Making this right now for pie night and can't wait to try it!
valentina
Yay! I hope you love it!
Shannon Rose
If I were going to use a different crust for this filling would you recommend traditional or graham cracker? We don't need gluten free in our house.
valentina
Hi Shannon, yes absolutely. I think a traditional pie crust would be great! Graham cracker delicious also, so whichever you prefer. Enjoy!
Jeanne @JollyTomato
Valentina, this was so delicious - thank you so much for sharing it at our meeting. The funny thing is my family came to visit right afterwards and everyone loved it so much they were arguing over the last slice! I just shared this link with my mom and my sister. : ) Great seeing you!
valentina
Oh my gosh, Jeanne, that's SO nice! Thanks you! I'm so happy everyone liked it and thank YOU for sharing you delicious pies and your gorgeous home with all of us! XOXO
Miranda
We have some winter squash we just steamed… and then my son said let’s make pie. Question- why does the squash need to be roasted at least 6 hours prior??
Valentina
Hi Miranda, Thanks for writing in. When you roast a whole butternut squash (that's about 4 pounds) the roasting time is about 1 hour, 45 minutes, and it takes a while to cool enough to work with, an hour or so. So while it takes about half the time, I recommend making it 6 hours ahead to be sure it’s fully ready and completely cooled when you're ready to make the pie. This way there's no rush when you’re putting everything together. I always like to build in a little buffer time for an easier cooking experience (especially with this pie since many people make it for a big holiday dinner when they're also cooking other things). Hope that makes sense. 🙂 ~Valentina. I hope you love the recipe.
sippitysup
Well if this doesn't take the cake (I mean pie). I love that it takes two expected holiday pies (pumpkin and pecan) and mashed them into one pie that's totally new to me. GREG
valentina
Greg, I consider you an authority on pies, so thank you so much!! 🙂
David
Looks wonderful! I have always wondered about using butternut for a pie... and now I know!
valentina
Truthfully, if you didn't know, you would assume it's pumpkin. 😉 I just love using freshly roasted butternut and it takes on the spices so nicely.
Cathy | She Paused 4 Thought
This pie tasted so amazing. I couldn't tell it was butternut. What a great way to sneak some vegetables into dessert. 😉
valentina
Thanks so much, Cathy! So happy I got to share it (& your pie!) with you. XOXO
Blanca
This looks absolutely amazing. I have some butternut squash at home. Yay!! You are the best!!!
valentina
Thanks so much, Blanca! I hope you love it! XOXO
Blanca
This pie was amazing ... even though I burnt the crust. It gave it character. My co worker loved it too. Burnt crust and all!
valentina
Oh that makes me so happy, Blanca! I'm making it again this week for Thanksgiving. Thank you for sharing. xoxo
Blanca
Just so you know I have a pie in the oven right now. Thank you. I'm hooked!
valentina
Yay! This makes me so happy. (I just pulled mine out of the oven!!!) Happy Thanksgiving to you! 🙂