Have you ever wondered how to make dulce de leche at home? This is an incredibly easy, one ingredient dulce de leche recipe, and it makes for a great edible holiday gift! 
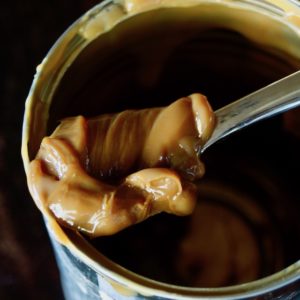
Seriously, how gorgeous is that!?
One ingredient is all you need!

And yes, it takes a whopping six hours or so to turn it into "gold," but you'll only be involved for about five minutes. The rest of the time, it'll just do "its thing" on the stove.
This is the sort of thing I do when I'm making other things in the kitchen, or have things to do around the house.

What is Dulce de Leche?
- Homemade Dulce de Leche is made from sweetened condensed milk, which is cow's milk that has had the water removed and sugar added to it. It's a very thick, super sweet milk. When the sweetened condensed milk is cooked very slowly, it turns into dulce de leche, which literally means "milk candy." Yum!
- It's all about caramelizing, which is pretty much my favorite cooking technique. You can caramelize the natural sugars in most foods to bring out a deeper and more intense flavor.
It can be added to a plethora of baked goods or covered with chocolate. It can be drizzled over ice-cream, mixed into cookie dough, eaten with a spoon, and the list goes on.

Homemade Dulce de Leche
- Remove the label from a can of sweetened condensed milk, and puncture it twice with a bottle opener at the top.
- Place the can into a pot on top of a cloth.
- Next, fill the pot with water, to just about ½ inch from the top of the can.
- Simmer for about six hours, replenishing the water from time to time so it more or less stays at the same level.
That's pretty much it!

I hope now that you know easy it is to make this at home, you'll try it.
Maybe even give someone a pretty jar of it as an edible holiday gift.

I never met a person who didn't love it!

Recipes to Make With it
Enjoy every last spoonful of this "gold" deliciousness!
Ducle de Leche
Ingredients
- 1 (14 ounce) can sweetened condensed milk
Instructions
- Remove the paper label and use a bottle opener to puncture the top of the can on two opposite sides. These holes are very important because they will keep the can from exploding during the cooking!
- Place a small cloth in the bottom of a sauce pot -- this will keep your can from making a racket! (Your pot should be about the height of the can, or higher.)
- Place the can directly on the cloth and then fill the pot with water to about ½-inch below the top rim of the can.
- Bring the water to a boil and immediately turn the flame to the lowest setting. The idea is to keep the water at a slight simmer. Let it simmer like this for 6 hours. Every 45 minutes or so, refill the water to ½-inch below the top rim of the can, as it will continue to evaporate. You will see a little bit of white milk ooze out of the top, and that's OK -- don't mess with it!
- Use a thick kitchen towel to remove the can from the water. Open the can with an opener, and pour the milk -- which will now be a rich caramel color -- into a small mixing bowl. Use a heat resistant, rubber spatula to get every bit out of the can (it will be firmer towards the bottom.) Use a metal whisk to blend until it's smooth. This should only take a few seconds.
NOTES
NUTRITION
Cooking On The Weekends is a participant in the Amazon Services LLC Associates Program, an affiliate advertising program designed to provide a means for sites to earn advertising fees by advertising and linking to Amazon.com.

David
Living here in the Southwest, so many people use this (or close to this) method for making their own, and it is sooooo much better! Amazingly, I have not tried it but you are convincing me that the time is now!
valentina
Even though it's essentially hours of keeping the water level up in a pot, I love it. When you finally open the can to see the caramel color and stir, it's as satisfying as opening the ice cream maker once it's done churning. Know what I mean? 🙂
Ron
Wow, I've not seen a "church key" (bottle opener) like that for years. I've tried making Dulce De Leche, but with mixed results. I now know why. I didn't put a cup towel underneath and didn't cook it long enough. Our sweetened condensed milk comes in a 400ml can size which is larger than I remember Eagle Brand coming in, should I cook it longer? I do love simplicity.
valentina
Hi Ron. I'm happy to have impressed you with my old bottle opener. I do like old school things in my kitchen.
Yes, I think more time with the larger can. The important this is that the water level stays about about 1/2 inch below the rim of the can the whole time. The longer you leave it, the darker it becomes. Have fun! 🙂
Deb|EastofEdenCooking
What a fabulous holiday gift! (Although I'd have to keep some for me!)
valentina
Of course! (I always do.) 🙂
Gerlinde
Wow, this is great. As soon as I get home and have 6 hours I will make this. Pinned !
valentina
Thanks! Perfect activity while unpacking form travels. 😉
Nancy
This would make a fabulous holiday gift - especially with a few of your recipes to go along with it!!!
valentina
Awww thanks Nancy! I might steel that idea. 😉
David @ Spiced
This is an excellent kitchen hack, Valentina! I've heard about this method, but I've never tried it myself. In fact, I was just thinking the other day that I wanted some dulce de leche for a dessert...and then you posted this. Perfect timing, my friend! It's like you read my mind or something. 🙂
valentina
It's the perfect thing to have on the stove while you're cooking up some of your delicious recipes. 🙂
Jamielyn
SO delicious! Need to make this at home ASAP!
valentina
Thanks! Watch out -- I ate my last batch with a spoon. 😉
Andrea Metlika
This is now going to be my newest baking staple. Thank you for the tutorial.
valentina
Yay! That's awesome Andrea! Thanks. 🙂
Lucy Parissi
I haven't made this for a long time - thanks for reminding me how easy it is to do.
valentina
Thanks Lucy! Enjoy!
Emma
I'd heard about making dulche de leche in a slow cooker before but thought there must be more to it than that! I didn't realise it was so easy!!! I've got to give this a try.
valentina
Yes, Emma, SO easy. Enjoy! 🙂