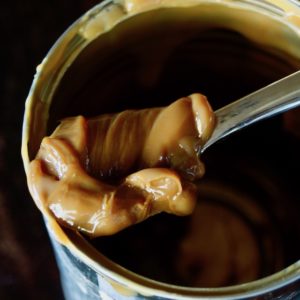
Have you ever wondered how to make dulce de leche at home? This is an incredibly easy, one ingredient dulce de leche recipe, and it makes for a great edible holiday gift! 
Seriously, how gorgeous is that!?
One ingredient is all you need!

And yes, it takes a whopping six hours or so to turn it into "gold," but you'll only be involved for about five minutes. The rest of the time, it'll just do "its thing" on the stove.
This is the sort of thing I do when I'm making other things in the kitchen, or have things to do around the house.

What is Dulce de Leche?
- Homemade Dulce de Leche is made from sweetened condensed milk, which is cow's milk that has had the water removed and sugar added to it. It's a very thick, super sweet milk. When the sweetened condensed milk is cooked very slowly, it turns into dulce de leche, which literally means "milk candy." Yum!
- It's all about caramelizing, which is pretty much my favorite cooking technique. You can caramelize the natural sugars in most foods to bring out a deeper and more intense flavor.
It can be added to a plethora of baked goods or covered with chocolate. It can be drizzled over ice-cream, mixed into cookie dough, eaten with a spoon, and the list goes on.

Homemade Dulce de Leche
- Remove the label from a can of sweetened condensed milk, and puncture it twice with a bottle opener at the top.
- Place the can into a pot on top of a cloth.
- Next, fill the pot with water, to just about ½ inch from the top of the can.
- Simmer for about six hours, replenishing the water from time to time so it more or less stays at the same level.
That's pretty much it!

I hope now that you know easy it is to make this at home, you'll try it.
Maybe even give someone a pretty jar of it as an edible holiday gift.

I never met a person who didn't love it!

Recipes to Make With it
Enjoy every last spoonful of this "gold" deliciousness!
Ducle de Leche
Ingredients
- 1 (14 ounce) can sweetened condensed milk
Instructions
- Remove the paper label and use a bottle opener to puncture the top of the can on two opposite sides. These holes are very important because they will keep the can from exploding during the cooking!
- Place a small cloth in the bottom of a sauce pot -- this will keep your can from making a racket! (Your pot should be about the height of the can, or higher.)
- Place the can directly on the cloth and then fill the pot with water to about ½-inch below the top rim of the can.
- Bring the water to a boil and immediately turn the flame to the lowest setting. The idea is to keep the water at a slight simmer. Let it simmer like this for 6 hours. Every 45 minutes or so, refill the water to ½-inch below the top rim of the can, as it will continue to evaporate. You will see a little bit of white milk ooze out of the top, and that's OK -- don't mess with it!
- Use a thick kitchen towel to remove the can from the water. Open the can with an opener, and pour the milk -- which will now be a rich caramel color -- into a small mixing bowl. Use a heat resistant, rubber spatula to get every bit out of the can (it will be firmer towards the bottom.) Use a metal whisk to blend until it's smooth. This should only take a few seconds.
NOTES
NUTRITION
Cooking On The Weekends is a participant in the Amazon Services LLC Associates Program, an affiliate advertising program designed to provide a means for sites to earn advertising fees by advertising and linking to Amazon.com.

Maria castillo
I’ve grown up with Dulce de leche it’s a staple in my house from on toast to a cake filling.. I make it all the time and I’ve never puncture the can just take off label and fill with water to the top.. It has never exploded.
My grandmother used to make it this way and my sisters and I do it all the time.
valentina
Thank you, Maria. That's good to know. I've never tried it any other way, but I'll give it a go. Much appreciated and I wish you a very happy holiday season. 🙂 ~Valentina
Mimi
I’ve only made this from scratch! This is fabulous! There is a restaurant we go to in Dallas called Javier’s, and they serve cajeta crepes, and they’re to die for. I started going in 1978, and we still go when we’re in Dallas. In any case, that was my introduction to cajeta. Wait. Now that i say that, is it the same as dulce de leche?!!!
valentina
If only I were going to Dallas soon! The crepes sound delicious! I think cajeta is different . . . maybe with cinnamon and I think it's made with goat milk. Now I'm thinking dulce de leche crepes. If I can give up Nutella, that is. 😉 Thanks for visiting, Mimi. 🙂
Christina Conte
That's so great that you can make it by opening the can first! I've always made it by boiling the sealed tin. The risk is that it explodes if you allow the water to dry out completely, which obviously, I take precautions so that it doesn't happen, but your method is definitely safer. I'm telling you, you have to try Banoffee Pie with your finished tin! 🙂
valentina
It's on my list! can't wait to try it. YUM!
Maria castillo
I’ve been making Dulce de leche for many years since I was brought up with it. But as a Chilean we don’t make any incisions in the can. All covered in a big pot of of water we boiled it for 3 hours.topping it with water as needed. Just take the label and boil away.It works and nothing happens to the cans.
valentina
Hi Maria, Thanks so much for sharing this method. I'm going to try it your way next time.It would be great to cut the time by half. I'll post results here when I do. And thanks for stopping by.:-)