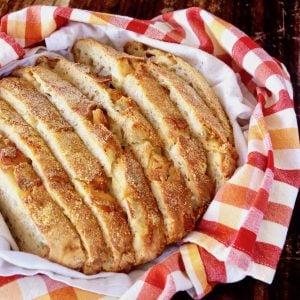
This Asiago Bread is one of the easiest, most delicious breads I've ever made. Baked in a Dutch Oven, it's a rustic, overnight no-knead bread recipe. With a gorgeous crisp, golden crust and soft interior with generous chunks of cheese, this artisan bread is always a huge hit!

This Asiago Bread recipe came to me from a friend, Elizabeth of Bella's Breadbox. She's an absolutely incredible baker, and every time I make this recipe, I'm astounded by its simplicity and deliciousness!
I think you too will be amazed, and I'm so excited to share it with you. This Overnight no-knead bread takes no muscle and only a few minutes of active work time. And when I tell you it's delicious, it's truly a have-a-bite-and-close-your-eyes-kind-of-delicious, if you know what I mean.
The Ingredients

- Asiago cheese - Buy the cheese in a block or wedge. We'll be cutting it into chunks. You can use shredded Asiago cheese if you'd like, though there's something sort of magical about those melting generously-sized cubes.
- bread flour - I use this one, and you can find it at most large grocery stores. It's perfect for Asiago cheese bread. (King Arthur is also great.)
- salt - For this recipe use table salt, not Kosher. If you use Kosher, use twice as much.
- active dry yeast - In this recipe for Asiago bread, active dry yeast is used instead of instant yeast because it's a no-knead dough with a long rising time. You should be able to find it in almost any grocery store.
- black pepper - Preferably freshly ground.
- cornmeal - The cornmeal is just for dusting the dough, and it also adds a very subtly nice texture to the surface of the bread.
How to Make it
* Note that you must begin making the bread in the evening, the day before you want to bake it. Otherwise you might have to get up in the middle of the night to deal with it. Hence the name, Overnight No-Kned Bread.
- In a medium-sized bowl, stir together the flour, cheese, salt, yeast and pepper. Add the tepid to warm water and use a wooden spoon to mix until you have a wet and sticky dough, about 30 seconds. Cover the bowl very tightly with plastic wrap, and let sit at room temperature until the surface is dotted with tiny bubbles, and the dough has at least doubled in size, 12 to 18 hours.
Below: The ingredients, before and after mixing.


Below: The water is added, and the dough is mixed.


Recipe tip: For this first rise of the dough, the full 18 hours will result in a more intense flavor.
- When the first rise is complete, generously dust a clean, dry work surface with more bread flour. Use a bowl scraper or rubber spatula to scrape the dough out of the bowl in one piece, and onto the floured surface.
Below: Dough after 18 hours, in the bowl and on the work surface.


- Use lightly floured hands to lift the edges of the dough in towards the center to make it round.
Below: Rounded dough, on work surface and flipped over on tea towel.


Recipe tip: When you're getting ready for the second rise, the dough will be on the sticky side, so be sure to flour your hands.
- Place a tea towel on your work surface and generously dust it with cornmeal. Gently place the dough on the towel, seam side down. If the dough is sticky, dust the top lightly with flour. Fold the ends of the tea towel over the dough to cover it. Place it in a warm, draft-free spot to rise for about 2 hours, until it’s almost doubled in size.
Below: Dough wrapped in tea towel before 2nd rise, and unwrapped after.


- About 15 minutes before the end of the second rise, adjust a rack to the center of the oven and preheat it to 475°F. Place a covered 4 to 5 quart heavy pot on the rack to preheat. A Dutch Oven is ideal -- there's something so comforting about baking bread in a cast iron Dutch Oven.
Recipe Tip: After the second rise, if you're not sure it's ready after 2 hours, gently poke it with your finger. If it holds the impression or very slowly fills, it's ready, and if it springs back quickly, let it rise for another 15 minutes or so.
- Remove the preheated pot from the oven and uncover it (with pot holders!). Unfold the tea towel and quickly and gently invert the dough into the pot, seam side up. Be careful, as the pot will be very hot! Cover the pot and bake for 30 minutes.
Below: Dough inverted into pot before baking, and after 30 minutes.


- Remove the lid and continue baking until the bread is a deep chestnut color, about 15 minutes. Use a heatproof spatula or pot holders to gently lift the bread out of the pot and place it on a rack to cool thoroughly, about 1 hour.
Below: Bread after total baking time.


Recipe Tip: For both rising times, and especially the second, the dough should be in a warm place. For the second rise, if it's a sunny day, just let the dough rise outside in direct sunlight. I always take advantage of the sun for this when I can.
Substitutions and Variations
- Asiago. Yes, you can substitute the Asiago with another cheese. Of course, then it won't be Asiago Bread, so you can give it a new name like Cheddar Bread or Gruyère Bread. 😉 You can try all sort of hard cheeses -- if you want to make it spicy, use Pepper Jack.
- Cornmeal. The cornmeal is for dusting the the dough, and I like the super subtle texture it adds. That said, it's a small enough amount that if you don't have it, just use more of the bread flour as a substitute.
- Feel free to throw in fresh herbs. Super finely chopped rosemary or thyme would be great. Use about 1 tablespoon.

Serving Suggestions
Before we get into serving options, try a slice of the bread about an hour after it's out of the oven, on its own. It's truly amazing, and it might be all you need.
There are also so many good things to eat with Asiago cheese bread, and the possibilities are endless!
- Really, any type of sandwich would be delicious using this bread, and I especially like using it for a veggie or ham sandwich. The cheese is already included, of course.
- A bowl of soup or chili is always excellent with a warm rustic loaf of bread like this one. Asiago cheese bread is perfect with Spicy Roasted Pepper Soup, Red Kuri Squash Soup and hearty vegetarian chili.
- I don't think I've ever served a stew without a delicious bread. Imagine this cheesy, crusty bread sopping up leftover sauce from this Braised Brisket Stew. It's incredible.
- If you serve a main course salad, this bread is a lovely accompaniment.
- To serve the whole loaf on the table, it's nice to warm it and wrap a pretty cloth napkin around it.
- For a really rich and decadent way to serve the bread, warm it up, then mix roasted garlic into room temperature unsalted butter and spread it on the the warmed bread.

How to Store Fresh Asiago Cheese Bread
- While this bread is the most amazing the day it's made, it will keep well if it's stored properly.
- Even though there is cheese in this bread, you can still leave the freshly baked bread out at room temperature for about 24 hours.
- Avoid refrigeration. Storing fresh bread in the refrigerator can actually speed up the staling process because it can cause the moisture in the bread to evaporate.
- The best place to store fresh bread for more than a day or so is the freezer. Freezing bread helps keep the moisture locked in. It has to be wrapped tightly without the possibility of air getting in. Freezer bags are best, and you can freeze an entire loaf, a whole, sliced loaf, or individual slices this way for about 2 months.
How to Thaw and Warm Frozen Bread
If your bread has been in the freezer, take it out the day before you want to serve/eat it, and place it on a counter at room temperature. The next day, place the bread loaf or slices on a sheet pan and place in a preheated 350°F oven just until it's warm, about 15 minutes.
Pro Tip: For added moisture, sprinkle a bit of water on the oven floor just before you close the door to create steam. Using a spay bottle is perfect for this.
Other Types of No-Knead Bread Recipes
This is hands down the best recipe for a rustic cheese bread! I hope you find it as incredible as I do!
Asiago Bread Recipe
Equipment
Ingredients
- 3 cups bread flour (plus a bit more for dusting)
- 2 cups cubed Asiago cheese (10 to 12 ounces)
- 1 teaspoon table salt
- ¾ teaspoon active dry yeast
- ½ teaspoon freshly ground black pepper
- 1⅓ cups tepid to warm water
- cornmeal for dusting
Instructions
Make the Dough and 1st Rise
- In a medium-sized bowl, stir together the flour, cheese, salt, yeast and pepper. Add the water and use a wooden spoon to mix until you have a wet and sticky dough, about 30 seconds. Cover the bowl tightly with plastic wrap and let sit at room temperature until the surface is dotted with bubbles, and the dough has at least doubled in size,12 to 18 hours.
2nd Rise
- When the first rise is complete, generously dust a work surface with flour. Use a bowl scraper or rubber spatula to scrape the dough out of the bowl in one piece onto the floured surface. Use lightly floured hands to lift the edges of the dough in towards the center. Nudge and tuck in the floured hands to lift the edges of the dough in towards the center to make it round.
- Place a tea towel on your work surface and generously dust it with cornmeal. Gently place the dough on the towel, seam side down. If the dough is sticky, dust the top lightly. Fold the ends of the tea towel over the dough to cover it. Place in a warm, draft-free spot until it has doubled in size, about 2 hours.
Bake
- About 15 minutes before the end of the second rise, preheat the oven to 475℉ with a rack in the middle. Place a covered 4 to 5 quart Dutch Oven on the rack to preheat.
- Use pot holders to carefully remove the preheated Dutch Oven and remove the lid. Unfold the tea towel and quickly and gently invert the dough into the pot, seam side up. Be careful as the pot will be very hot! Cover and bake for 30 minutes.
- Remove the lid and continue baking until the bread is a deep chestnut color, about 15 minutes. Use a heatproof spatula or pot holders to gently lift the bread out of the pot and place it on a rack to cool thoroughly before slicing, about 1 hour.
NOTES
NUTRITION
Cooking On The Weekends is a participant in the Amazon Services LLC Associates Program, an affiliate advertising program designed to provide a means for sites to earn advertising fees by advertising and linking to Amazon.com.


angiesrecipes
wow that's a lot of cheese! The bread looks fabulous.
Valentina
Ha! Yes, it's a lot. And so good! Enjoy. 🙂 ~Valentina
sherry
i do love an overnight no-knead bread! Yes that is a lot of cheese as Angie said 🙂 Bet it tastes great.
Valentina
Thanks so much, Sherry. Enjoy! 🙂 ~Valentina
2pots2cook
Definitely my Sunday morning project. Printed! Thank you so much!
Valentina
Happy Sunday! Hope you love it, Davorka. 🙂 ~Valentina
Barb
Best bread I have ever eaten!
Valentina
Yay! I'm so happy you tried it and love it. 🙂 ~Valentina
Dawn
I love bread as is, but especially homemade bread. And you've made it even better by adding cheese. A slice (or two) of this would be so yummy toasted with a generous smear of butter. 🙂
Healthy World Cuisine
Love all of that cheesy goodness in each and every bite. Hot out of the oven, I bet this bread does not even need any butter. Delicious all on its own!
Valentina
Thanks so much. Yes, soooo great right out of the oven! 🙂 ~Valentina
Jeff the Chef @ Make It Like a Man!
What a gorgeous bread, and I love the method!
Valentina
Thanks, Jeff. Hope you give it a go. 🙂 ~Valentina
Roberta Stone
This is so easy -- hardly any ingredients to measure out and hardly any cleanup to deal with AND SO SCRUMPTIOUS!!!
Valentina
Yay! I'm so happy it was a hit in all ways. Thank you! 😀 ~Valentina
Raymund
Love how this bread turned out, looks like a sourdough without the sourness of it
Valentina
Thank you, Raymund! Great description. 🙂 ~Valentina
David Scott Allen
We have added a lot of things to our no-knead bread, but never cheese. What a great idea!
Valentina
It really is so good. Who knew no-knead breads could be so delicious and versatile!? 🙂 ~Valentina
Lenka
Would it change anything to cut the recipe size in half? Just bake it for less time potentially?
Valentina
Hi Lenka, I haven't made a half recipe before, but I think it should work well. And yes, the baking time will likely be less, but don't change the temperature or the method of baking. If you decided to the make the full recipe, it freezes really well. It should be sealed tightly in a freezer bag. You can freeze an entire loaf, a whole, sliced loaf, or individual slices this way for about 2 months. I hope you love it! 🙂 ~Valentina
Liza Fox
I love this bread! I made it to serve with Gazpacho and it was perfect. Everyone loved it and I have some leftovers to enjoy. Thanks for a delicious and simple recipe! Delish!!
Valentina
Hi Liza, How fantastic! It's perfect with Gapzacho -- I'm so happy you loved it. Thanks so much for sharing. 🙂 ~Valentina