Peanut Butter Miso Cookies are extraordinary! With a rich and complex flavor profile, they are sweet-salty, chewy and crunchy — all at once.

Peanut butter cookies with miso got a lot of buzz a year or so ago when a recipe for them was in the New York Times Food Section.
It’s no exaggeration when I tell you my version of Peanut Butter Miso cookies is extraordinary. (Not to brag. 😉 ) They’re utterly delicious and their flavor is truly unique.
Anyone who tries them, who doesn’t know there’s miso paste in the recipe, will be bewildered and want to know what magical ingredient makes them so amazing.
Jump to:
The Ingredients
- unsalted butter - It's best to bake (and cook) with unsalted butter so you can control exactly how much salt is in the recipe.
- white miso paste (Shiro Miso) - You should be able to find this in most large grocery stores and all Asian markets.
- creamy, salted peanut butter
- brown sugar - Light or dark.
- granulated sugar
- pure vanilla extract or paste
- eggs
- all purpose flour
- baking powder - If you don’t bake regularly, it’s a good idea to check to be sure your baking powder is still good. To do so, pour a couple of tablespoons of boiling water over about ¼ teaspoon of the baking powder. If it starts to fizz, it’s still good.
- baking soda - Like the baking powder, If you don’t bake regularly, it’s a good idea to check to be sure your baking soda is still good. To do so, pour a couple of tablespoons of vinegar or lemon juice over about ¼ teaspoon of the baking soda. If it starts to fizz, it’s still good.
(See recipe card below for quantities.)
Substitutions and Variations
- Can you make them gluten-free? You can absolutely make gluten-free Peanut Butter Miso cookies. Use a gluten-free white miso paste and Gluten-Free Cup 4 Cup All Purpose Flour.
- Feel free to add in chocolate chips. I can’t believe I’m saying this, but with these cookies, I wouldn’t overdo it. You really want to taste the blended flavor of the peanut butter and miso, and too much chocolate might overpower that.
- You can use pure vanilla extract or paste. I like using paste because it adds the specks of vanilla. This one is my favorite.

Recipe Tips
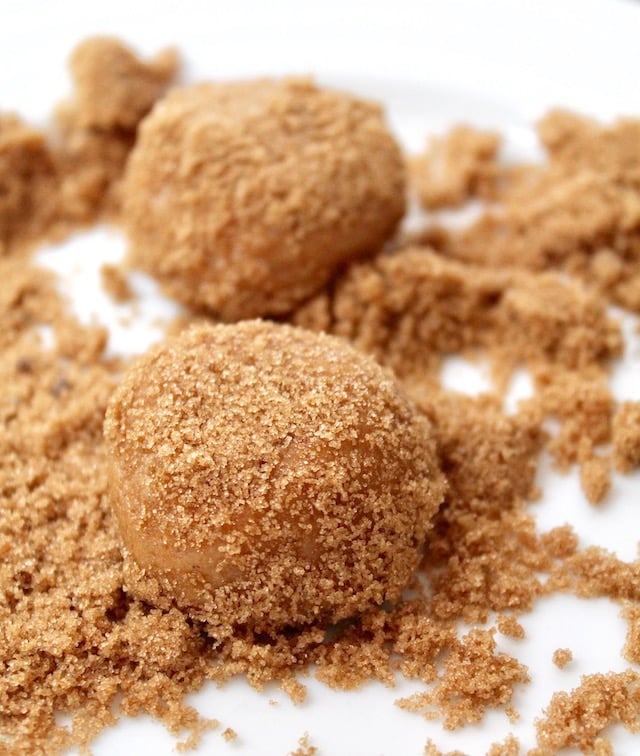
- The recipe instructs coating the cookie dough in brown sugar before baking them. This step adds a delightful, subtle crunch, and also adds to the crinkled affect. If however, you’re pressed for time, they’ll still be delicious if you skip this.
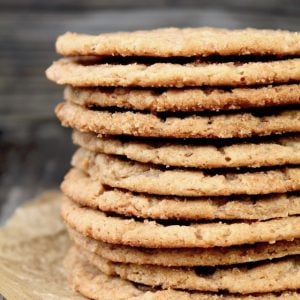
- These cookies are quite thin. That's how they should be. When they come out of oven they might not look like it, but they will flatten as they cool.
- I find that these cookies work best with creamy, salted peanut butter without palm oil. (This is always a healthier choice anyway.) There will be oil on top of the peanut butter when you open the container. Just add everything and blend as you mix the batter. I use Trader Joe's Creamy Salted Peanut Butter From Unblanched Peanuts and it's perfect.
- These cookies are about 1½ tablespoons of dough each, but you can make them smaller if you'd like to. (Of course the final count will vary, depending on their size.)
- As with most cookies fresh out of the oven, they need to cool on the baking sheet before you try to move them. If you try to remove them too early, they’ll fall apart. Wait about 15 minutes.
How to Make Them
This recipe is easy to make and the results are so delicious!
- Combine the butter, miso paste, peanut butter, sugars and vanilla and blend.
- Add the eggs and blend.
- Add the flour, baking soda and powder and blend.
- Shape into balls, roll in brown sugar and place on a parchment lined baking sheet with lots of space between them.
- Bake at 350°F for about 10 minutes and cool.

(More detailed instructions are below.)
What do these cookies taste like?
Miso has an umami flavor, which makes these cookies rich, full and complex. What is umami? Umami flavor can be described as a meaty, earthy, savory deliciousness that deepens flavor. It’s not quite sweet, salty, sour, or bitter. In Japanese, Umami means “essence of deliciousness.”
The miso paste creates a divine texture of crispy on the outside, and soft and chewy inside. Even though they are a very thin cookie, you will notice this variation in texture.

Can you make them ahead?
Yes, you can definitely make these cookies ahead -- however, I think they are at their best the day they're baked. (The become a bit less crisp after the first or second day.)
Room temperature. In a tightly sealed container, the cookies can be kept at room temperature for about three days.
Refrigerator. In a tightly sealed container, they can be stored in the refrigerator for up to a week.
Freezer. Sealed tightly, you can store the cookies for about a month or so in the freezer.
A Few Savory Recipes with Miso
- Miso Broiled Black Cod wtih Bok Choy
- Miso Garlic-Ginger Tofu
- Spicy Miso Glazed Eggplant
- Miso Fried Rice
What exactly is miso?
Miso is a traditional Japanese seasoning. It’s made by fermenting soybeans with salt and Koji (a type of mold used in Japan to convert starch into sugar in rice, barley and other foods.). You can find out more about miso here.
Is miso gluten-free?
Most brands of miso paste are not gluten-free as they may contain grains that are not. However, there are several brands that are. Here are a few: Cold Mountain, Hikari and Eden. (I use Cold Mountain and it’s excellent.)
I hope you love Peanut Butter Miso cookies as much as my family and I do!
Peanut Butter Miso Cookies Recipe
Ingredients
- ½ cup unsalted butter, softened to room temperature
- ⅓ cup white miso paste (Shiro Miso)
- ¾ cup creamy, salted peanut butter
- 1¾ cups brown sugar (light or dark), divided
- 1 cup granulated sugar
- 1 tablespoon pure vanilla extract or paste
- 2 large eggs
- 2 cups all-purpose flour
- 1 teaspoon baking powder
- 1 teaspoon baking soda
Instructions
- Set oven and prepare baking sheets. Preheat the oven to 350°F and line a couple of baking sheets with parchment paper.
- Combine wet ingredients. In a very large mixing bowl, combine the butter, miso paste, peanut butter, 1¼ cup of the brown sugar, granulated sugar and vanilla. Mix until smooth. Then add the eggs and mix until smooth.
- Add dry ingredients. Add the flour, baking powder and baking soda and mix just until combined and you no longer see any dry spots.
- Shape and roll in brown sugar. Add the remaining ½ cup of brown sugar to a large plate and move it around so it's in a thin even layer (more or less). Shape the cookie dough into balls, rolling it between your palms, about 1½ tablespoons each. Then roll the shaped balls in the brown sugar, coating all sides. If the sugar looks thick, gently roll the coated ball between your palms again and some of it will fall off. Place them on the parchment-lined baking sheets as you go, with at least 2½ inches between them, as they will spread.
- Bake and cool. Place the baking sheets in the preheated in the 350°F oven and bake until the cookies have spread, look "crinkled" on top, and are slightly golden along the edges, about 8 to 10 minutes. Let the cookies cool on the baking sheet for at least 15 minutes.
NOTES
NUTRITION
Cooking On The Weekends is a participant in the Amazon Services LLC Associates Program, an affiliate advertising program designed to provide a means for sites to earn advertising fees by advertising and linking to Amazon.com.
Mrs Kate Greeves
I'm really looking forward to making these, do you think you could make the cookies and freeze them before baking? If so would you defrost them before baking or bake them from frozen?
valentina
Hi Kate, Thanks so much for writing in. I'm happy you're going to make these. We love them in my house. 🙂 Yes you can freeze the dough before baking them. I would shape them first, though. You don't have to thaw them before baking, and the cooking time might be different. They also might turn out a bit more rounded if you put them in frozen. The flavor will be the same. Enjoy and happy baking. ~Valentina