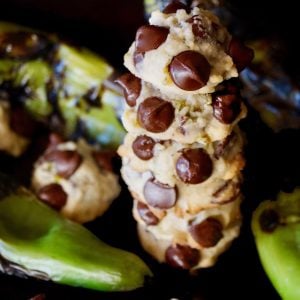
Hatch Chile Chocolate Chip Cookies are subtly spicy, very sweet, and have chocolate and a touch of coconut in every bite. A gluten-free, super unique cookie that will totally wow everyone.

Hatch Chile Cookies with Chocolate Chips are much sweeter than they are spicy, but the touch of heat brings about an incredible flavor combination.
Years ago, Melissa’s Produce introduced me to Hatch Chiles, and I’ve been cooking and baking with them ever since. Here are a handful of the recipes I've created with them.
With only about 30 minutes of active work time, these cookies are super fun to make and even more fun to serve.
About the Key Ingredients

(I often suggest brands I love and use — these are only suggestions and this is not a sponsored post.)
- Hatch chiles - Hot, medium or mild, depending on preference. Hatch chiles are almost always marked with their heat level where they're sold.
- powdered (confectioners) sugar
- unsalted butter - I always bake (and cook) with unsalted butter so I can better control how much salt is in the recipe.
- 1 to 1 gluten-free flour - I use Cup4Cup Gluten-Free Multi-Purpose Flour, and I think it's the best.
- coconut flour - I use this one.
(See recipe card below for quantities.)
Substitutions
If I don't list an ingredient with a substitution, it means I think it's best not to substitute it.
- Hatch chiles. For Chile Chocolate Chip Cookies, the Hatch can be substituted with Poblano Chiles.
- Cup4Cup Gluten-Free Multi-Purpose Flour. Cup4Cup is my favorite brand of gluten-free flour. It consistently yields great results. You can however, use another 1 to 1 gluten-free flour if it includes xanthan gum, which is a binder. You can also use regular all-purpose flour if keeping it gluten-free isn't important for you.
- Semisweet chocolate chips. Feel free to use white chocolate or milk chocolate chips.
Recipe Tips and Substitutions
- One of the joys of using Hatch Chiles is that you can purchase them with the amount of heat you like. They're (almost always) marked "mild, medium or hot" in stores. Choose the amount of heat you want in your Hatch Chile Cookies. I use medium or hot for this recipe because it balances nicely with sweet ingredients.
- When the edges start turning golden, the cookies are ready -- even if they still seem to look raw in the middle. A couple of minutes out of the oven and they'll become solid.
How to Make Them
- Roast, peel and seed the chiles. (Here’s a step-by-step guide for roasting chiles.)

- Finely chop the prepared Hatch chiles.

- In a large mixing bowl, combine the powdered sugar with the softened butter. Once it’s smooth, add the egg and vanilla and mix again.
- Add the gluten-free flour, coconut flour and salt. Mix to blend.
- Fold in the roasted, peeled and chopped Hatch chiles, shredded coconut and chocolate chips.

- Use a 1¼-inch cookie scoop to shape the cookies, placing them on a parchment-lined baking sheet as you go, very close together so they all fit on one sheet. Cover the sheet tightly with plastic wrap and refrigerate for at least 2 hours.
- Now place them on another baking sheet with parchment paper, only this time, with a couple of inches between them. Bake in a preheated 325°F oven until the cookies are golden along the edges, about 12 minutes.
- Let them cool on the baking sheet for a few minutes and then transfer them to a cooling rack. Serve at room temperature.
More Unique Chocolate Chip Cookie Recipes
- Banana Chocolate Chip Cookies
- Olive Oil Chocolate Chip Cookies
- Buckwheat Chocolate Chip Cookies
- Raspberry Chocolate Chip Cookies
- Black Pepper Chocolate Chip Cookies
- Creamy Coffee Chocolate Chip Cookies
Storing the Cookies
- These cookies should be stored in an air-tight container. If you don’t plan to serve them within the first day or so after baking them, you can freeze them.
- They can be kept frozen in an air-tight container for up to a month. (Longer is okay, but the longer they're frozen, the more moisture they'll lose.)

I hope you love these Hatch Chile Cookies as much as my family and I do!
Hatch Chile Chocolate Chip Cookies Recipe
Ingredients
- ½ cup roasted, peeled and seeded Hatch Chiles (mild, medium or hot)* from about 2 large peppers
- 1¼ cup powdered sugar
- 1 cup unsalted butter, softened
- 1 large egg
- 1 tablespoon vanilla extract
- ¾ cup Cup4Cup gluten-free all-purpose flour
- ½ cup coconut flour
- 1 teaspoon salt
- ½ cup sweetened shredded coconut
- 2 cups semisweet chocolate chips
Instructions
- Prepare chiles. Roast, peel, seed and finely chop the Hatch chiles.(Here's a step-by-step guide for roasting peppers.)
- Prepare baking sheet. Line a baking sheet with parchment paper and set aside.
- Make batter. In a large mixing bowl, combine the powdered sugar with the softened butter. Mix until smooth and then add egg and vanilla. Again, mix until smooth.Add the gluten-free flour, coconut flour and salt. Mix to blend.Fold in the roasted, peeled and finely chopped Hatch chiles, shredded coconut and chocolate chips.
- Shape, refrigerate, set oven. Use a 1¼-inch cookie scoop (about 1 generous tablespoon) to shape the cookies into small balls of batter, placing them on the parchment-lined baking sheets as you go, very close together so they all fit on the one sheet. Cover the sheet tightly with plastic wrap and refrigerate for at least 2 hours.About 15 minutes before you're ready to bake, preheat the oven to 325°F .
- Bake. Remove the shaped batter from the refrigerator, and line one or two more baking sheets with parchment paper. Place the balls of batter on them, only this time, with a couple of inches between them. Bake in the preheated 325°F oven until the cookies are golden along the edges, about 12 minutes. (Repeat this process until you've baked all of the batter.)
- Cool. Let them cool on the baking sheet for a few minutes and then transfer them to a cooling rack. Cool them at least until they are room temperature before serving.
NOTES
NUTRITION

Cathleen
Can you substitute regular flour?
Valentina
Hi Cathleen, you can substitute the gluten-free all purpose with regular flour. However, if you also don't want to use the coconut flour, it's not an even switch. You would use about half as much of regular flour, so if you switch both, the total flour amount is 1 cup. I haven't tested it this way, but I think it should work out well. 🙂 ~Valentina
Lynn
Do you know if these can be freezed? I'd love to make them for my daughter's wedding, but need them done ahead of time.
valentina
Hi Lynn, Yes, you can absolutely freeze these. I would say you can freeze them for up to 3 weeks IF they are wrapped and sealed tightly, once they've cooled completely. I'd thaw them a day ahead of time. Enjoy and congrats to your daughter! 🙂 ~Valentina