• Skip to primary navigation
  • Skip to main content
  • Skip to primary sidebar
Cooking On The Weekends
  • About
    • Press
    • Contact
  • Recipe Index
  • "How To"
  • Work with Me
menu icon
go to homepage
  • About
    • Contact
  • Recipe Index
  • Subscribe
  • Shop
    • Facebook
    • Instagram
    • Pinterest
  • subscribe
    search icon
    Homepage link
    • About
      • Contact
    • Recipe Index
    • Subscribe
    • Shop
    • Facebook
    • Instagram
    • Pinterest
  • ×
    Home » Breakfast & Brunch Recipes » Italian Herb Bread

    Italian Herb Bread

    Dec 10, 2024 · by Valentina · 22 Comments

    This post may contain affiliate links.

    Jump to Recipe

    Italian Herb Bread is an incredibly delicious, easy-to-make, no-yeast, no-knead bread, with a gluten-free option. With just 15 minutes of active work time, you'll be slicing this savory bread in 90 minutes.

    top view of herb bread sliced on cutting board

    This Italian Herb Bread has a delicious soft outer crust and a soft, somewhat dense interior.

    With generous helpings of fresh herbs and garlic, every bite is incredibly flavorful.

    My favorite way to serve it is toasted with unsalted butter, and it's also great for sandwiches, and delicious to serve warmed with dinner, especially comforting soups and stews.

    3 slices of stacked Italian herb bread with butter pat melting on top

    The Key Ingredients

    Below are the ingredients that make this bread extra delicious.

    • extra virgin olive oil - Olive oil creates a soft, moist texture that's perfect for this savory bread recipe. Use one you love because it will impart some of its flavor, too. It also helps to create the beautiful golden and crisp surface.(If you've ever made my chocolate chip cookie recipe with olive oil, you know how much I love baked goods with olive oil.)
    • buttermilk - Buttermilk adds a slightly tangy flavor, and because if its acidity, it helps the bread rise. It also helps to lighten the slightly dense texture, making it lovely to eat on it's own, but strong enough for sandwiches.
    • fresh garlic - I use a generous amount of garlic in this herb bread. It's excellent with the fresh herbs and the flavor makes it way into every bite. Use more or less if you'd like to.
    • oregano, rosemary, thyme - This aromatic and tasty combination of herbs is delicious and makes the bread pretty. And if you like one more than another, feel free to change it up. If you don't have fresh herbs, use can substitute with about ⅓ of the amount of dried herbs.

    The recipe calls for regular all-purpose flour, though it's easily Make it gluten-free with Cup4Cup Gluten-Free all-purpose flour (use 2 tablespoons less of it if you use it.)

    How to Make it

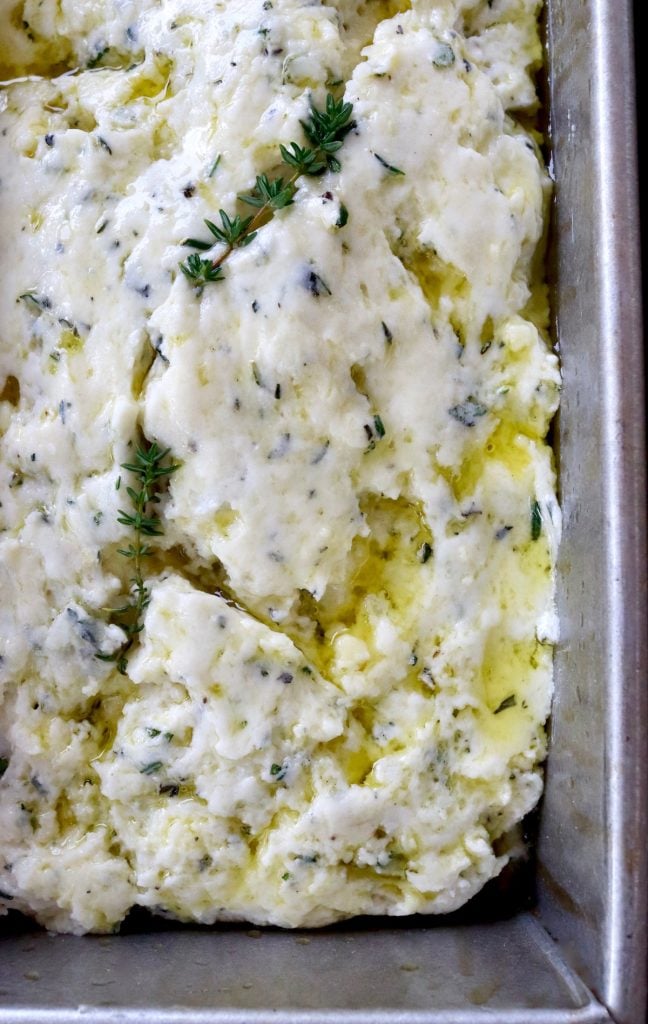
    - Preheat the oven to 350°F and coat the bottom and sides of a 12 x 4½ x 2½-inch bread pan with olive oil. 

    - Combine flour, baking powder, baking soda, sugar and salt and mix.

In another bowl, whisk buttermilk, egg and garlic. Pour this into the dry ingredients and add the olive oil and herbs. Mix to blend.

    - Pour the batter into the prepared pan, drizzle the remaining 2 tablespoons of olive oil evenly on top, and bake in the preheated 350°F oven until the bread is set and slightly golden on top, about 45 minutes.


    top view of Italian herb bread batter in loaf pan
    top view of Italian herb bread in loaf pan


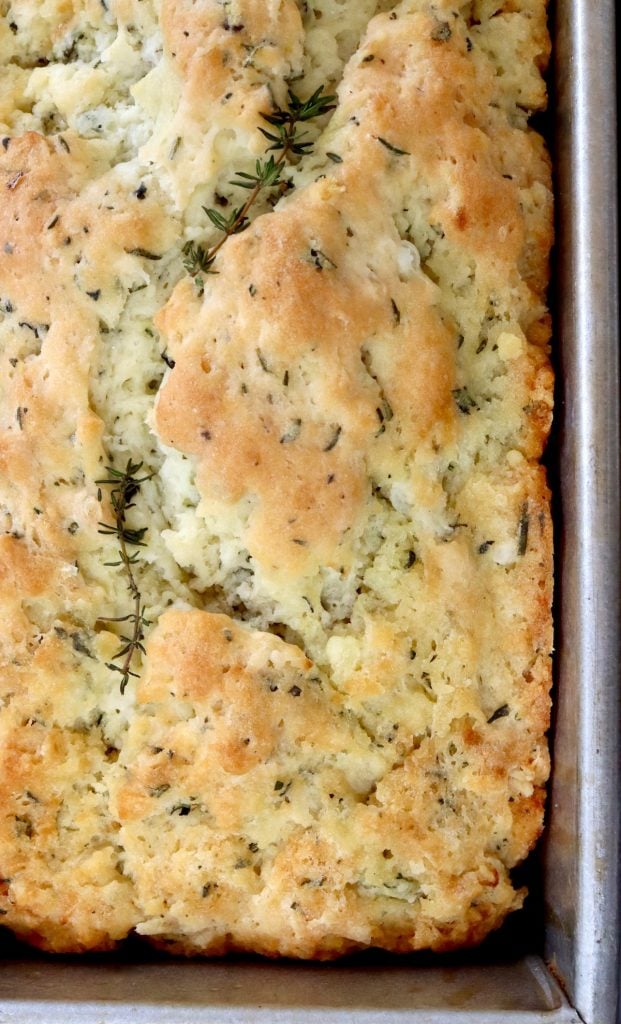
    - Let the bread cool in the pan for at least 10 minutes and wait at least 20 minutes before slicing.

    IMPORTANT BAKING TIPS: The instructions call for one 12 x 4½ x 2½-inch loaf pan. If you don't have one, the batter will  make 2 loaves in 8½ x 4½ x 2½-inch pans (bake approx. 30 minutes), or 18 biscuits in a standard-sized muffin pan (bake for 20 minutes).

    top view of Italian herb bread in muffin pan

    It's just as easy to bake Italian Herb bread as biscuits in a muffin pan, and the cooking time is about half.

    small pile of italian herb biscuits

    Serving Suggestions

    • This bread is firm enough to use for sandwiches, and will enhance everything between the slices.
    • As I mentioned above, toasted with butter is amazing.
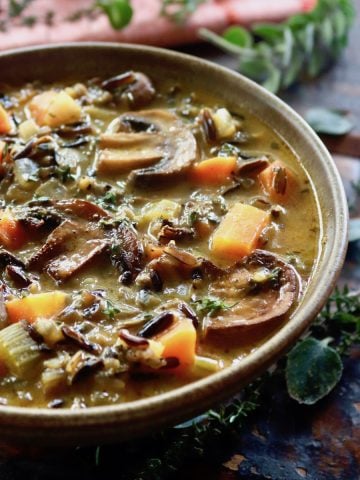
    • It's delicious to serve warmed alongside a bowl of chili, stew or soup.
    • They are lovely to serve as dinner biscuits (using a muffin pan -- see below), with almost any meal.

    Below are a handful of dishes that would be excellent with Italian Herb Bread.

    • Cream-colored ceramic bowl with crimped edges, filled with Tuscan white bean soup with fresh basil on top.
      Tuscan White Bean Soup or Stew
    • Close up of a brown ceramic bowl with creamy wild rice soup with a red cloth napkin and fresh herbs around. it.
      Cream of Mushroom Wild Rice Soup
    • Colorful striped bowl of brisket chili with fresh green herbs and chopped red onion on top.
      Brisket Chili with Bacon and Chipotles
    • Turkey meatballs and gnocchi in a large skillet with basil leaves.
      Stove-Top Meatballs and Gnocchi

    Can you make it ahead?

    There's nothing quite like a bread right out of the oven, so I always suggest serving it as close to the baking time as possible. However, yes, it will still be good if you make it ahead.

    • Room temperature. In a tightly sealed container or zip-lock bag, the bread can be kept at room temperature for about two days.
    • Refrigerator. In a tightly sealed container or zip-lock bag, it can be stored in the refrigerator for up 4 days.
    • Freezer. Wrapped tightly, you can store it for about a month in the freezer.
    • Unless it's at room temperature, always warm it before serving.

    Is Italian Herb Bread actually Italian?

    Nope. While the fresh herbs used -- oregano, rosemary and thyme -- are commonly used in Italy and often referred to as "Italian" in the United States, they are widely used all over the Mediterranean. And authentic Italian breads are not full of herbs like this one.

    top view, close up of herb bread sliced on cutting board

    More Savory Bread Recipes Without Yeast

    • Almond Butter Bread
    • Macadamia Nut-Honey Bread
    • Gruyère-Cauliflower Bread

    I hope you love this Garlic Italian Herb Bread as much as my family and I do.

    slices of stacked Italian herb bread with butter pat melting on top

    Italian Herb Bread Recipe

    Valentina K. Wein
    Garlic Italian Herb Bread is an incredibly delicious, easy-to-make, no-yeast, no-knead bread. With just 15 minutes of active work time, you'll be slicing this savory bread in an hour and a half.
    *See notes below the recipe for pan size options & related baking times
    5 from 6 votes
    Print
    Prep Time 15 minutes mins
    Cook Time 45 minutes mins
    Cooling Time 30 minutes mins
    Total Time 1 hour hr 30 minutes mins
    Course Side Dish, Snack
    Cuisine American
    Servings 10
    Calories 344 kcal

    Equipment

    • 12" bread pan

    Ingredients


    • ⅓ cup plus 3 tablespoons extra virgin olive oil, divided
    • 2¾ cups plus 2 tablespoons all-purpose flour (2¾ cup if using Cup4Cup Gluten-Free)
    • 1 tablespoon baking powder
    • 1 teaspoon baking soda
    • 1 tablespoon granulated sugar
    • 1¼ teaspoon salt
    • 2 cups buttermilk
    • 1 large egg, lightly beaten
    • 1 tablespoon plus 1 teaspoon minced garlic (the finer the better)
    • ⅓ cup finely chopped mixed fresh herbs (oregano, rosemary, thyme) washed and dried

    Instructions
     

    • Set the oven and prepare the pan. Preheat the oven to 350°F. Lightly coat the bottom and sides of a 12 x 4½ x 2½ inch bread pan with the 1 tablespoon of olive oil.
    • Make the batter. In a large mixing bowl, combine the flour, baking powder, baking soda, sugar and salt. Mix and then make a well in the center and set aside.
      In a medium-sized mixing bowl, gently whisk buttermilk, egg and garlic. Pour this mixture in the well in the dry ingredients and add the olive oil and herbs. Mix just until it's well everything is well blended.
    • Bake. Pour the batter into the oiled pan, drizzle the remaining 2 tablespoons of olive oil evenly on top, and bake in the preheated 350°F oven until the bread is set and slightly golden on top, about 45 minutes.
    • Cool. Let the bread cool in the pan for at least 10 minutes. Wait at least 20 minutes before slicing.

    NOTES

    * Makes 1 loaf in 12 x 4½ x 2½ inch pan (bake approx. 45 minutes)
    * Makes 2 loaves in 8½ x 4½ x 2½ inch pans (bake approx. 30 minutes)
    * Makes 18 muffins/biscuits in standard muffin pan (bake approx. 20 minutes)
    Calorie count is only an estimate.

    NUTRITION

    Calories: 344kcal
    Keywords garlic recipes, savory bread recipes, no yeast breads
    Have you tried this recipe?I'd love to see it on Instagram! Tag me at @cookingontheweekends or leave a comment & rating below.

    More Breakfast & Brunch Recipes

    • Small turquoise-rimmed ceramic bowl fill with chunky apricot preserves and a small golden spoon.
      The Best Apricot Preserves
    • Close up, cross section of a loaf of banana cake with chocolate chips.
      Gluten-Free Banana Cake with Chocolate Chips
    • sliced loaf of avocado zucchini bread
      Avocado Bread
    • Whole, sliced golden loaf of Asiago cheese bread in a red, orange and white checkered cloth.
      Asiago Bread

    Reader Interactions

    Comments

    1. Brittany

      May 16, 2012 at 3:00 pm

      I love your site! I just recently started staying at home so I could finish planning my wedding, get married in June, and take summer classes. Let me just say, this bread is getting made TONIGHT. I am so excited to try this and a lot of your other recipes. Thank you! I love finding new things and experimenting with new things in the kitchen.

      -Britt

      Reply
      • valentina

        May 16, 2012 at 7:08 pm

        Brittany, thank you for your sweet comment -- I'm happy to have you here! Hope you enjoy the recipes. And congratulations of your up coming wedding! How exciting! 🙂

        Reply
    2. Amy

      January 20, 2014 at 3:50 am

      5 stars
      Yum! This is the first garlic bread recipe I've tried that I was actually impressed with! Flavor wasn't overwhelming, fairly light and its actually moist! Thanks!

      Reply
      • valentina

        January 22, 2014 at 10:41 pm

        Amy, thank you for the lovely compliment! So happy all of your alterations worked well! 🙂

        Reply
    3. Jenn Ross

      September 02, 2014 at 4:17 pm

      5 stars
      I tried this recipe once, it was so delicious. That was also my first time visiting your site. Then I got a new computer and could not find the page to save my life. I've been searching for two days. Finally I found it and I'm so very, very thankful. I LOVE your site and it's now in my faves. Thanks!

      Reply
      • valentina

        September 03, 2014 at 2:32 am

        Jenn -- what a sweet comment. Thank you! I'm so very happy you found me again -- and that you loved the bread! 🙂 Valentina

        Reply
    4. Amy Swim

      October 19, 2014 at 8:06 pm

      5 stars
      We just made this tonight, and it's definitely a keeper. It came out a little heavy, but that'll happen when you leave the egg on the counter instead of in the dough. 🙂

      We used Pam to grease the pans, and a good bread knife, and were able to turn it out and cut it while still piping hot, which is how we prefer to eat our bread.

      Also, we baked some of the dough in pint size mason jars (about half full was perfect). We plan to give lasagne and garlic bread as gifts this holiday season, so we'll bake the lasagne in the bottom half of a jar, and top with foil. Then we'll bake this bread in a half pint jar and move it to place on top of the lasagne. Then of course make it look nice with labels and ribbon. We're hoping this will be a welcome change to all the sugar my daughter's teachers get every year. I've heard you can seal baked bread in mason jars and leave on a shelf for several months if you seal while it's hot. We're trying this with one jar of this bread.

      Reply
      • valentina

        October 20, 2014 at 4:27 pm

        Hi Amy, thanks so much for sharing your experience with this recipe. And what a fantastic gift idea -- I've never made bread in a jar before. What fun! (Maybe even better to be the recipient!) Thanks so much for spending time on my site. 🙂

        Reply
    5. Wanda

      November 15, 2014 at 2:08 pm

      5 stars
      just made these in muffin pans & used dried rosemary b/c that's what I had in the cabinet. The house smells wonderful! The muffins taste good, but didn't get that pretty brown top like your pic before they were done inside. Muffins might do better with a slightly lower temp. Also, they were a bit sweet for my taste, so I'll reduce the sugar next time. all in all -- its a keeper!

      Reply
      • valentina

        November 16, 2014 at 2:56 pm

        Hi Wanda! So happy you liked this recipe, and that you can adjust it to your taste. I LOVE when the scent of rosemary fills my house. 🙂

        Reply
    6. Abbey

      March 23, 2015 at 10:09 pm

      5 stars
      I just made this recipe and it came out so tasty! I used basil (I think it would be good either way though). The breads texture is so moist and yummy. Thanks for sharing this easy bread recipe!

      Reply
      • valentina

        March 24, 2015 at 5:47 am

        Hi Abbey! I'm thrilled you made and loved the bread! And the basil sounds like the perfect addition!

        Reply
    7. Sandy

      March 22, 2017 at 8:16 am

      Hi...Liking ur recipe a lot n wanted to give a try.I m a pure vegan.Can u suggest a substitute for an egg.

      Reply
      • valentina

        March 22, 2017 at 4:56 pm

        Sure. I haven't tried it with a substitute, but I think it would work. Here's how to make egg substitute with flax meal . . . I'd love to hear how it goes, whatever you use!

        Reply
    8. angiesrecipes

      December 23, 2021 at 7:38 pm

      I want a few slices with a bowl of hot steaming cheese soup 🙂

      Reply
    9. Karen (Back Road Journal)

      December 25, 2021 at 11:09 am

      Your herb bread sounds terrific and I really like the idea of turning it into muffins. I hope you have a wonderful Christmas.

      Reply
    10. Jeff the Chef @ Make It Like a Man!

      December 28, 2021 at 7:30 am

      This looks fantastic! I think I'd love it for breakfast.

      Reply
    11. 2pots2cook

      December 29, 2021 at 2:23 am

      5 stars
      WOW !!!!!!!! YOU SPEAK MY LANGUAGE DEAR ! I love, love it !!! I wish you and your family to have happy and healthy 2022. !

      Reply
    12. Christina

      January 01, 2022 at 6:21 pm

      Pass the butter, Valentina!! Looks good!

      Reply
      • valentina

        January 03, 2022 at 8:35 pm

        Thank you, my friend! And a very happy new year to you and your family. xo Valentina

        Reply
    13. Sarah Phillips

      November 30, 2024 at 1:36 pm

      Hi! I was thinking about making loaves of this bread for Christmas gifts this year. Does it require constant refrigeration and how long does it last? Would you recommend doing anything different or alternatives? Any advice would be great. Thank you!

      Reply
      • Valentina

        November 30, 2024 at 2:07 pm

        Hi Sarah, Thanks for writing in. If you're making this well in advance, your best option is freezing. Tips: Wrap loaves or muffins very well so no air can get in, and suggest they be served/eaten slightly warmed. Below is the storage guide line I have on the recipe page.
        Room temperature. In a tightly sealed container or zip-lock bag, the bread can be kept at room temperature for about two days.
        Refrigerator. In a tightly sealed container or zip-lock bag, it can be stored in the refrigerator for up to a 4 days.
        Freezer. Wrapped tightly, you can store it for about a month in the freezer.
        Unless it's at room temperature, always warm it before serving.
        Hope this helps and enjoy! 🙂 ~Valentina

        Reply

    Leave a Reply Cancel reply

    Your email address will not be published. Required fields are marked *

    Recipe Rating


    This site uses Akismet to reduce spam. Learn how your comment data is processed.

    Primary Sidebar

    Hi, I'm Valentina, certified chef, owner, recipe developer and photographer at Cooking on the Weekends. I'm also a mom of two boys and a Los Angeleno. I use seasonal whole foods to create unique and comforting recipes for casual entertaining.

    More about me →

    4TH OF JULY PARTY IDEAS

    • Several fruit appetizers on toothpicks with cherries and blueberries on a white plate.
      Mini Fruit Skewers
    • Large ceramic serving bowl full with Watermelon Basil Salad with feta, avocado, and balsamic reduction.
      Watermelon Basil Salad with Avocado
    • Close up of a Grilled Mediterranean Burger in a bun with all the fixins.
      Mediterranean Burgers with Olives and Feta
    • Close up of orange popsicle with fresh berries.
      Orange Popsicles with Fresh Berries

    POPULAR SUMMER RECIPES

    • Black bowl filled with mango salsa with a small Habanero pepper right on top.
      Mango Habanero Salsa
    • Light green bowl with strawberry and goat cheese salad and a dark wooden twisted-handled serving spoon.
      Strawberry Goat Cheese Salad
    • Green Lemon pesto with lemon slice and basil leaf on top, in a green bowl, fitted inside a yellow bowl.
      Lemon Pesto
    • Basil Pizza with one slice being taken off the plate.
      Basil Pizza with Pesto

    Footer

    ↑ back to top

    About

    • Privacy Policy
    • Press

    Newsletter

    Get new recipes you’ll love!

    Contact

    • Contact
    • Work with Me

    Review the privacy policy for Cooking on the Weekends

    Copyright © 2025 Cooking On The Weekends, All Rights Reserved